Conduction system pacing (His bundle and left bundle branch area pacing): a Cath Lab 101 guide
Reviewed by Rodnie Oro, cath lab charge nurse · Last reviewed: November 2026 · Education only, not medical advice
Conduction system pacing in one minute
What it is: A pacemaker in which the ventricular lead is placed on the heart's own conduction system instead of in the muscle. In His bundle pacing the lead sits at the His bundle; in left bundle branch area pacing (LBBAP) it is screwed deep into the septum to reach the left bundle. The heart is activated more naturally, with a narrower QRS.
Who it is for: People who need a pacemaker and are expected to be paced a lot, and some people with heart failure as an alternative to standard CRT, as decided by the device team.
Main risks: The same as a standard pacemaker (bleeding, infection, pneumothorax, lead moving), plus a small risk of the lead going through the septum into the left ventricle. Your team will explain your own risk.
Usually: Under local anaesthetic with sedation, about 1 to 2 hours, often home the same or next day.
On this page: What is conduction system pacing? · Who is it for? · When is it done? · Step by step · Recovery · Risks · Kit list · First time in the lab? · FAQ
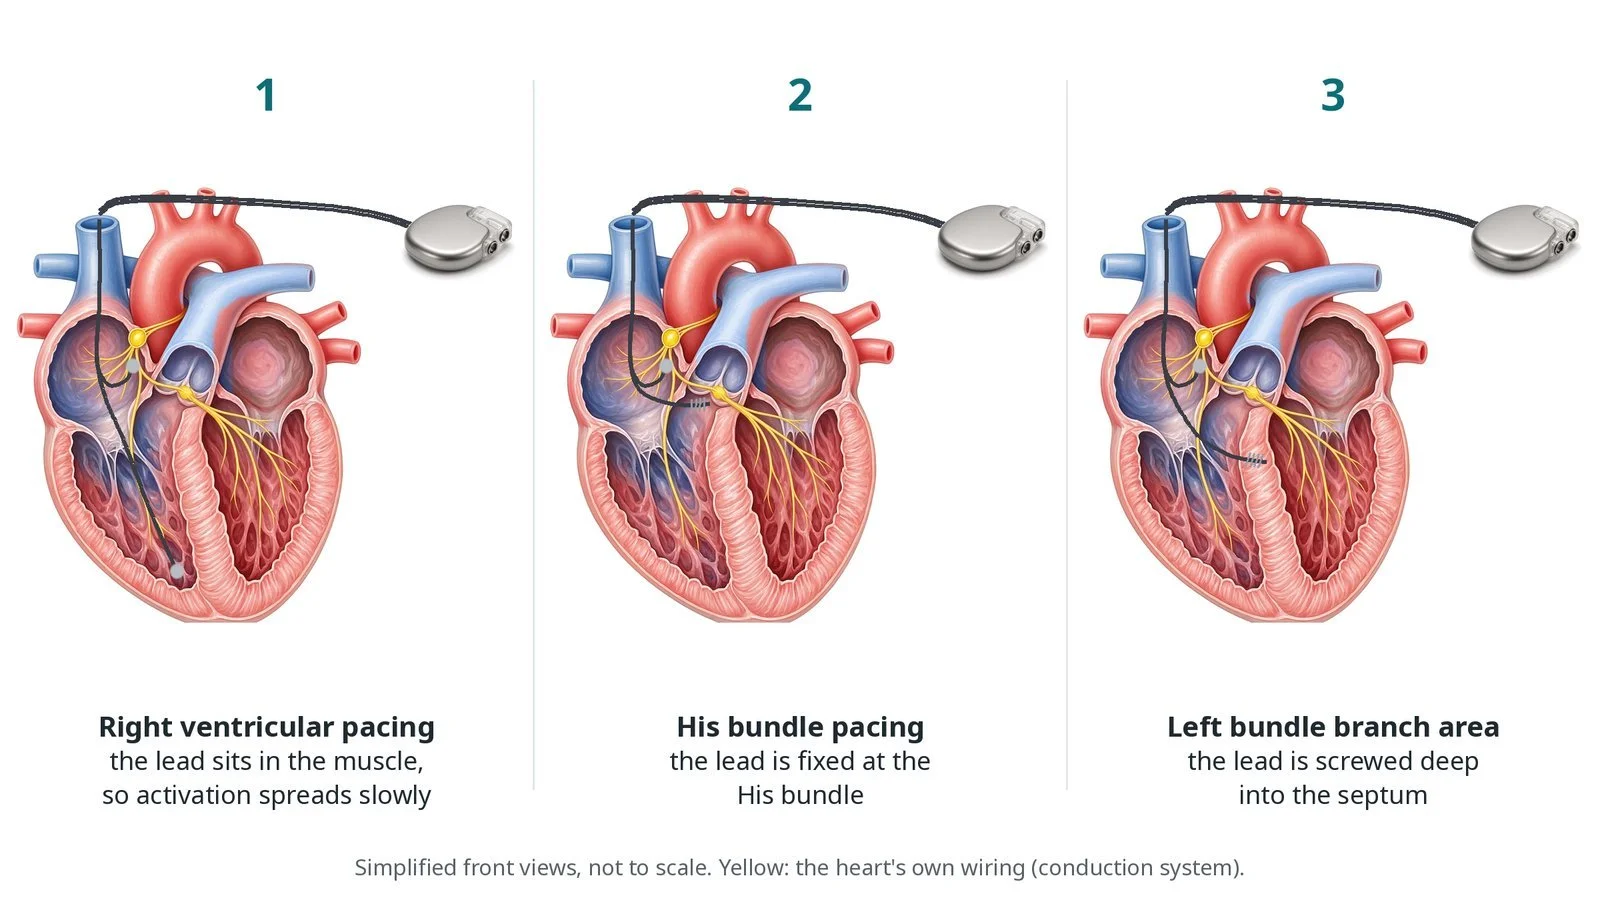
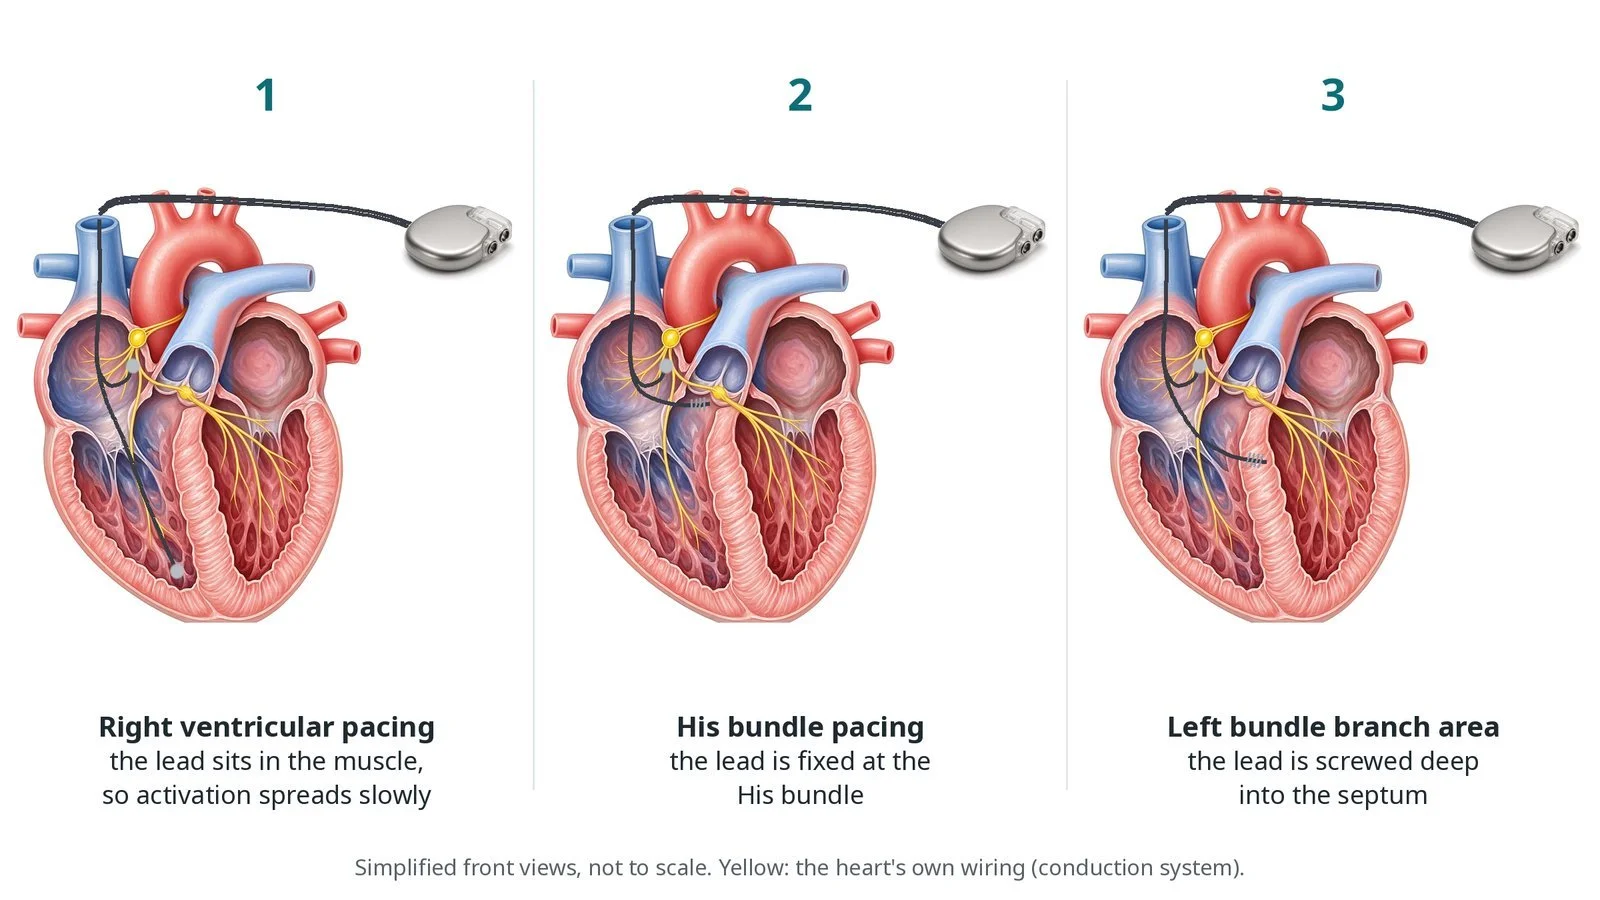
(1) Right ventricular pacing: activation spreads slowly through the muscle. (2) His bundle pacing: the lead is fixed at the His bundle. (3) Left bundle branch area pacing: the lead is screwed deep into the septum.
What is conduction system pacing?
The heart's electrical signal passes through the AV node into the His bundle, which runs at the top of the ventricular septum. It then splits into the right bundle branch and a broad left bundle branch that fans out over the left side of the septum. This fast wiring makes both ventricles squeeze together.
A standard right ventricular lead paces the muscle. The signal then spreads slowly from cell to cell, giving a wide QRS. Over years, a lot of right ventricular pacing can weaken the heart in some people.
Conduction system pacing places the lead on the wiring itself. His bundle pacing is close to natural, but the target is small and thresholds can be higher. Left bundle branch area pacing aims 1 to 2 cm below the His bundle, screwing the lead from the right side deep into the septum until it reaches the left bundle on the left side. It is now the more common approach.
New to the acronyms? See the Cath Lab Abbreviations A–Z.
Who is it for?
Decided by the device team, with ESC guidance and the 2025 ESC clinical consensus statement on conduction system pacing. It may be used:
when a pacemaker is needed and a lot of ventricular pacing is expected, such as complete heart block
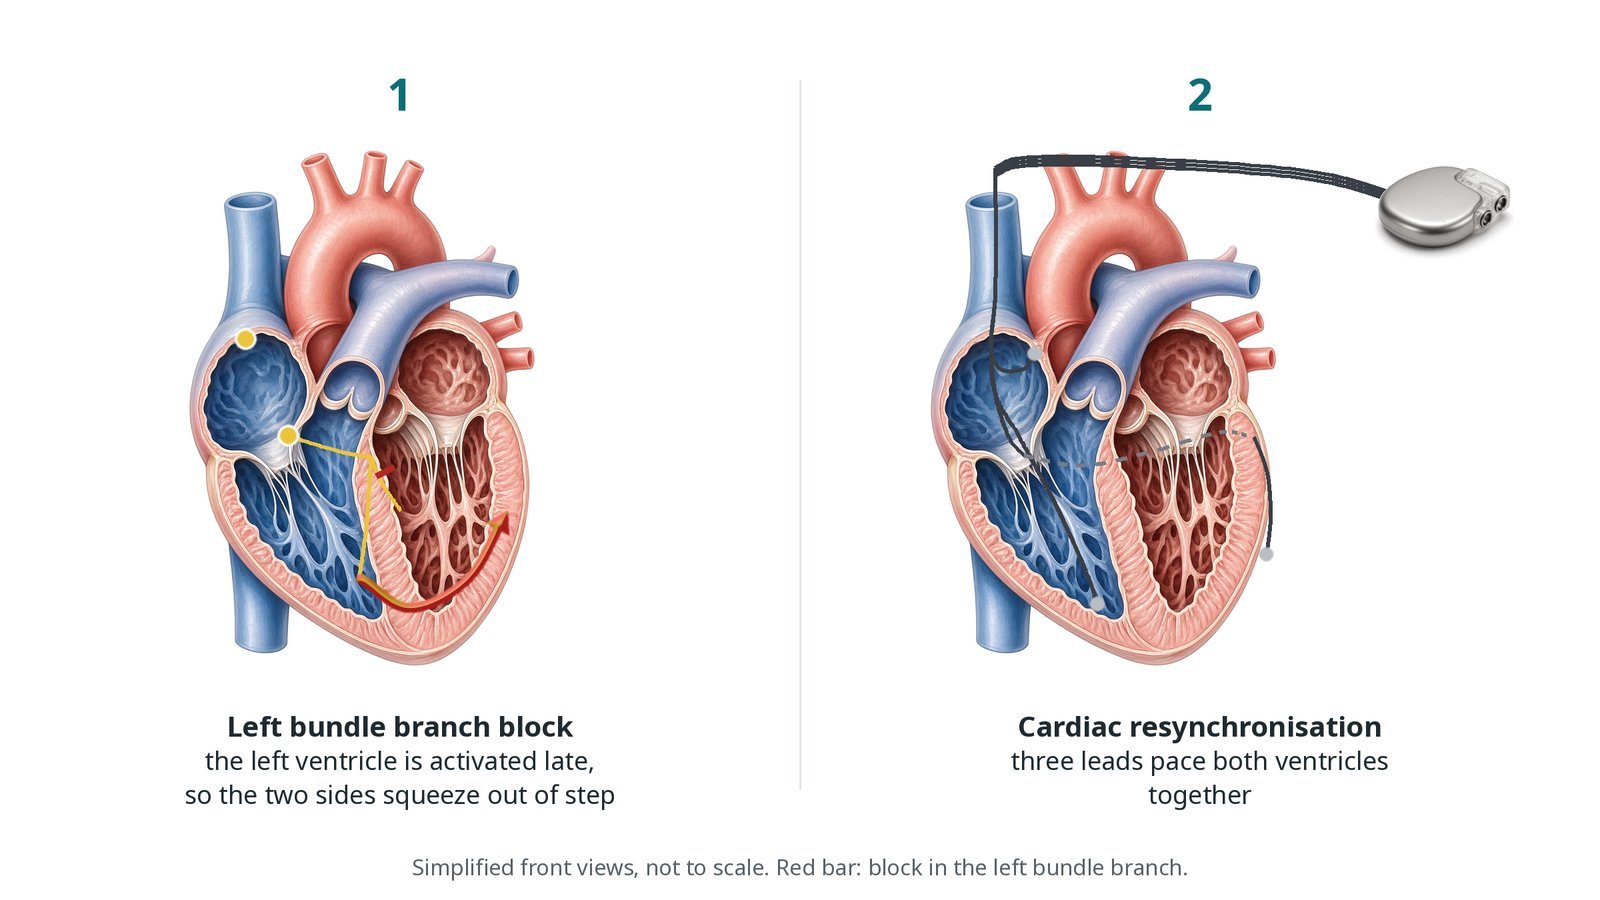
in heart failure with left bundle branch block, as an alternative to CRT, or when the coronary sinus lead cannot be placed
after AV node ablation
Who it may not suit: Some septums are scarred or thick, and the lead cannot reach the conduction system. The operator then places a standard lead or changes plan, which is discussed beforehand.
The decision is made by your heart team, who will talk through the reasons, the alternatives and the risks with you.
When is it done?
Usually as a planned pacemaker implant, with the same preparation: ECG, echo, blood tests, a medicine review and consent. Not every operator or centre offers it.
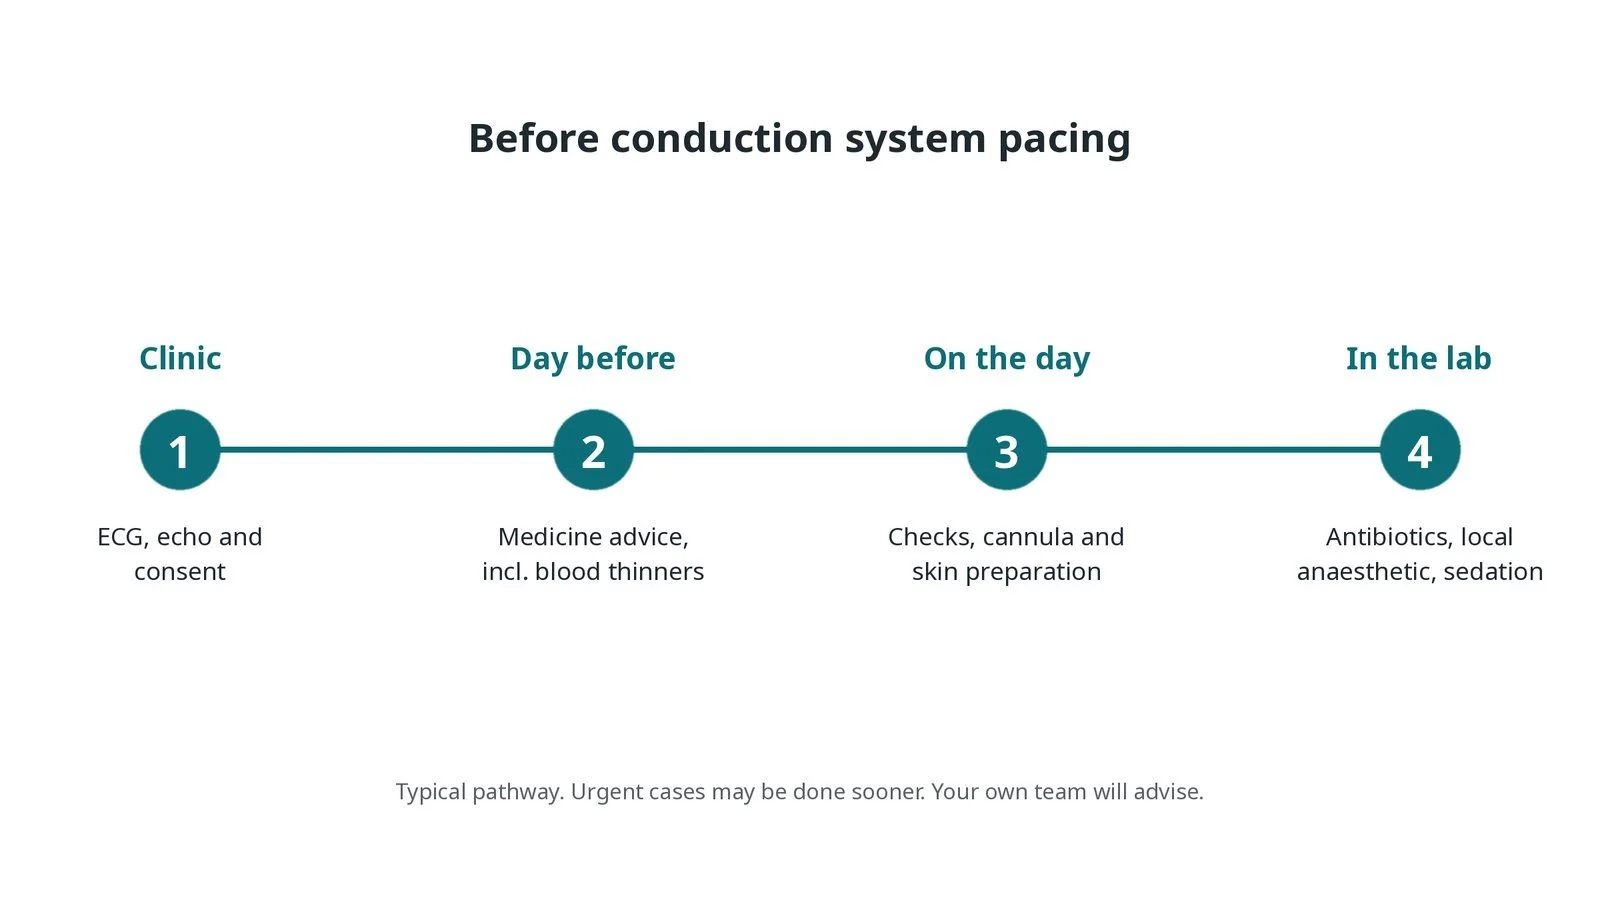
Before conduction system pacing: ECG, echo and consent; medicine advice; checks and skin preparation on the day; antibiotics, local anaesthetic and sedation in the lab.
Step by step
1. Getting ready
You lie on the X-ray table with ECG, blood pressure and oxygen monitoring. Antibiotics are given as per centre protocol, the skin below the left collarbone is cleaned, and local anaesthetic is given with sedation as needed. The physiologist sets up a full 12-lead ECG and the recording system, so the paced QRS can be judged beat by beat.
2. Access
Veins below the collarbone are entered, a pocket is made, and a shaped delivery sheath is passed across the tricuspid valve to the septum.
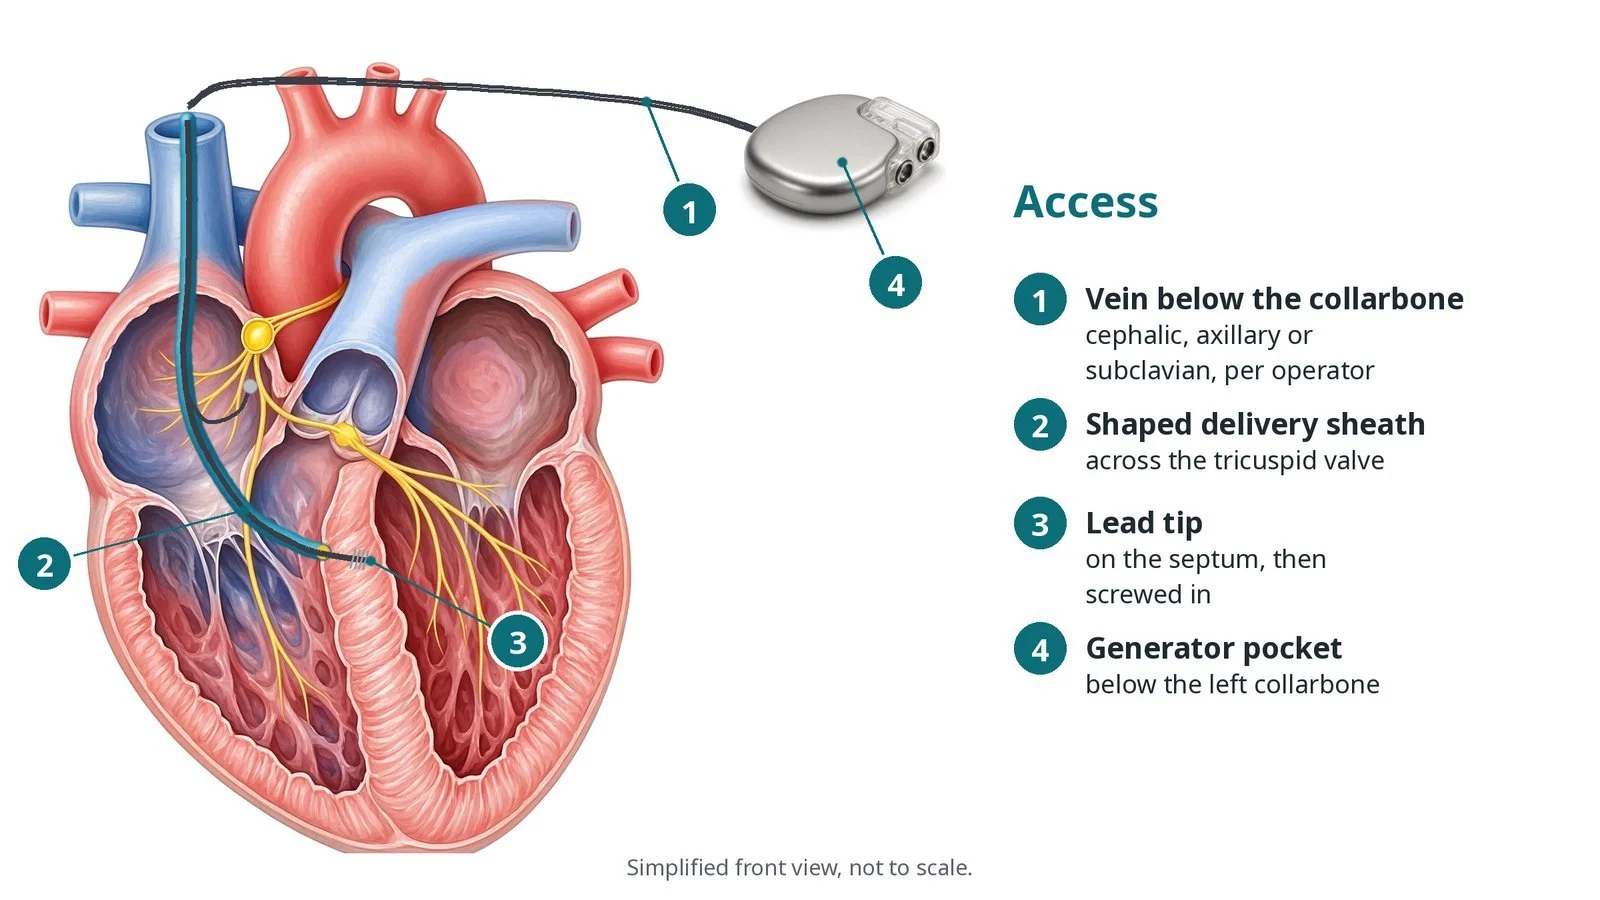
Access: (1) vein below the collarbone; (2) shaped delivery sheath across the tricuspid valve; (3) lead tip on the septum, then screwed in; (4) generator pocket below the left collarbone.
3. Placing the lead
A. Position. The sheath tip is placed on the right side of the septum. A small puff of contrast (septogram) shows the septum's edge and thickness.
B. Screw in. The lead is turned so its helix screws into the septum. For LBBAP it goes deeper with each set of turns while the operator watches the paced QRS and the lead's impedance.
C. Check. The physiologist checks the paced QRS shape and timing, such as how quickly the left ventricle is activated, against criteria per centre protocol.
D. Secure. Thresholds and sensing are measured, the sheath is slit away, and the lead is left with gentle slack.
Watch: A sudden fall in impedance, loss of capture or contrast in the left ventricle can mean the lead has gone through the septum. Tell the operator straight away; the lead is usually pulled back and repositioned.
4. Atrial lead and generator
A right atrial lead is usually placed. The leads are connected to the generator, the pocket is washed out, and the wound is closed in layers.
5. Checks before home
A 12-lead ECG records the paced QRS. A chest X-ray and a device check are done, often with an echo if there is concern about the septum.
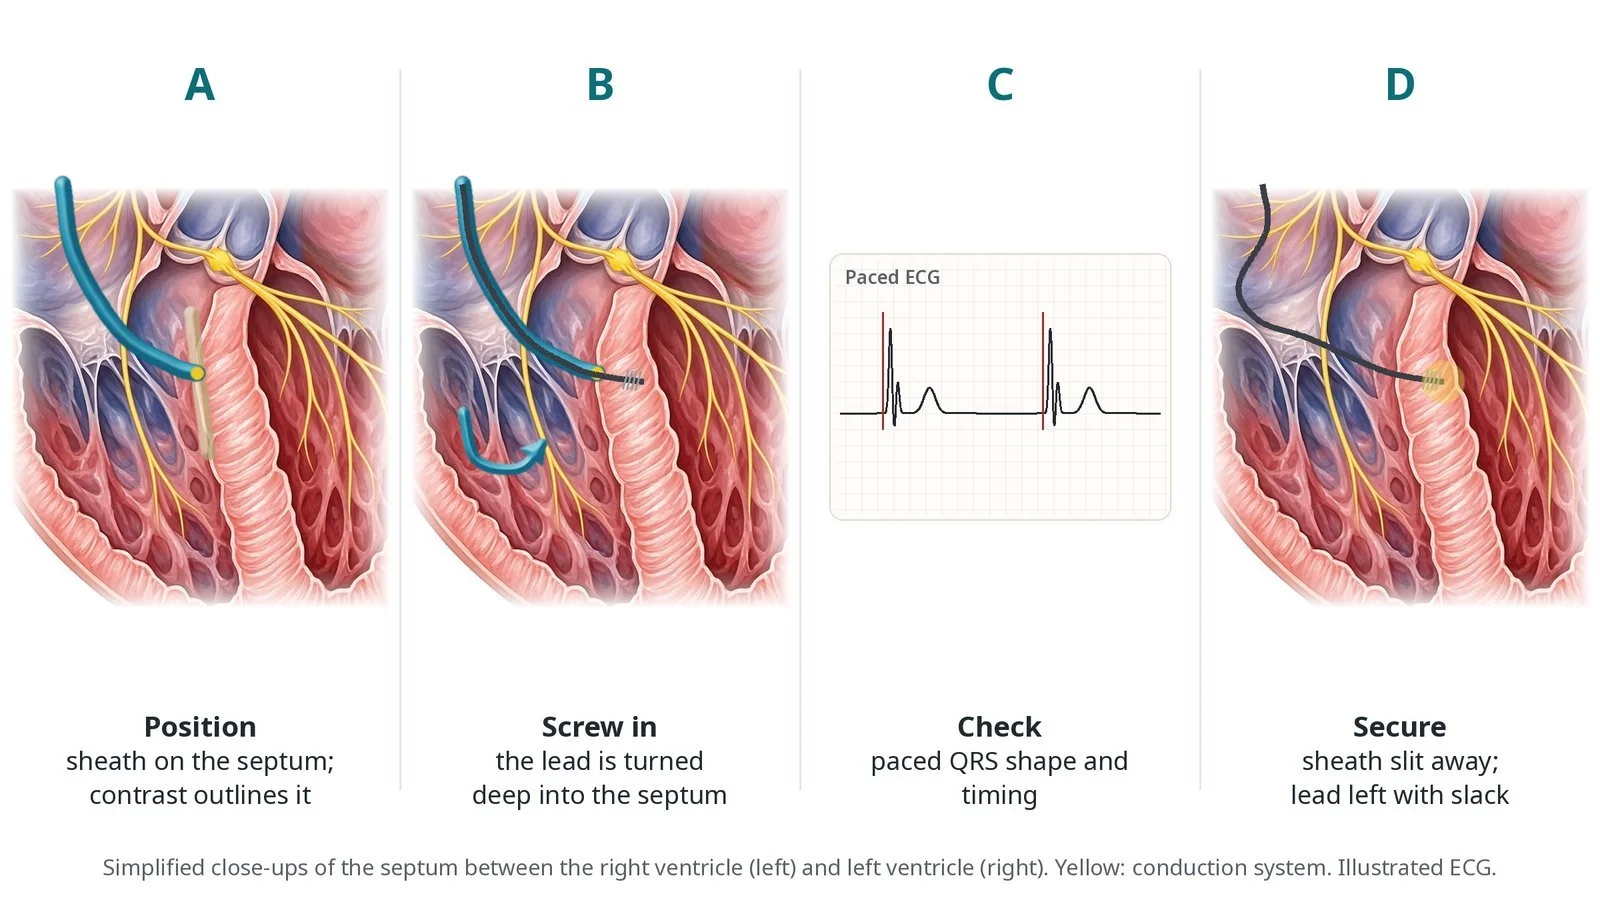
A: the sheath sits on the septum and contrast outlines it. B: the lead is turned deep into the septum. C: paced QRS shape and timing are checked. D: the sheath is slit away and the lead left with slack.
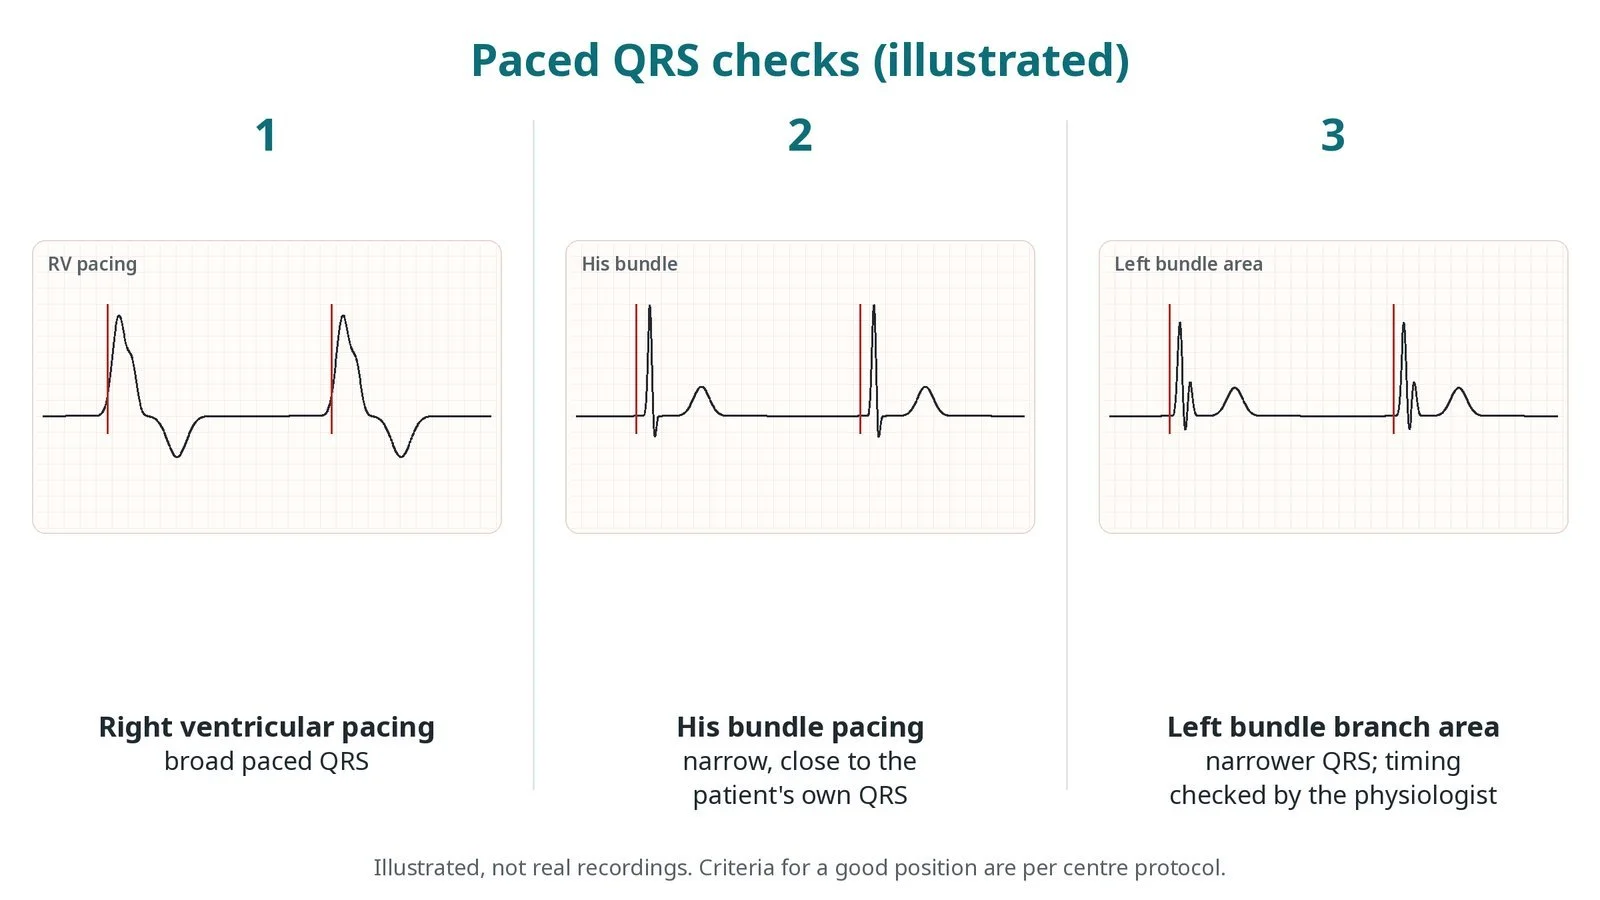
Illustrated, not real recordings: (1) right ventricular pacing gives a broad QRS; (2) His bundle pacing gives a narrow QRS; (3) left bundle branch area pacing gives a narrower QRS, with timing checked by the physiologist.
Recovery and aftercare
First hours: rest, with checks of the wound, blood pressure and heart rhythm, as per centre protocol.
Going home: often the same or next day, after a chest X-ray and device check.
Arm and wound: keep the arm below shoulder height and avoid heavy lifting for about 4 to 6 weeks, or as advised; keep the wound dry until healed.
Medicines: usual medicines continue; blood thinners restart as advised.
Driving: DVLA rules for a pacemaker usually mean no driving for at least a week; different rules apply for bus and lorry licences. Your team will advise.
Follow-up: wound check, then device clinic, often with remote monitoring.
Call 999 if you have chest pain, sudden breathlessness, fainting, or feel very unwell.
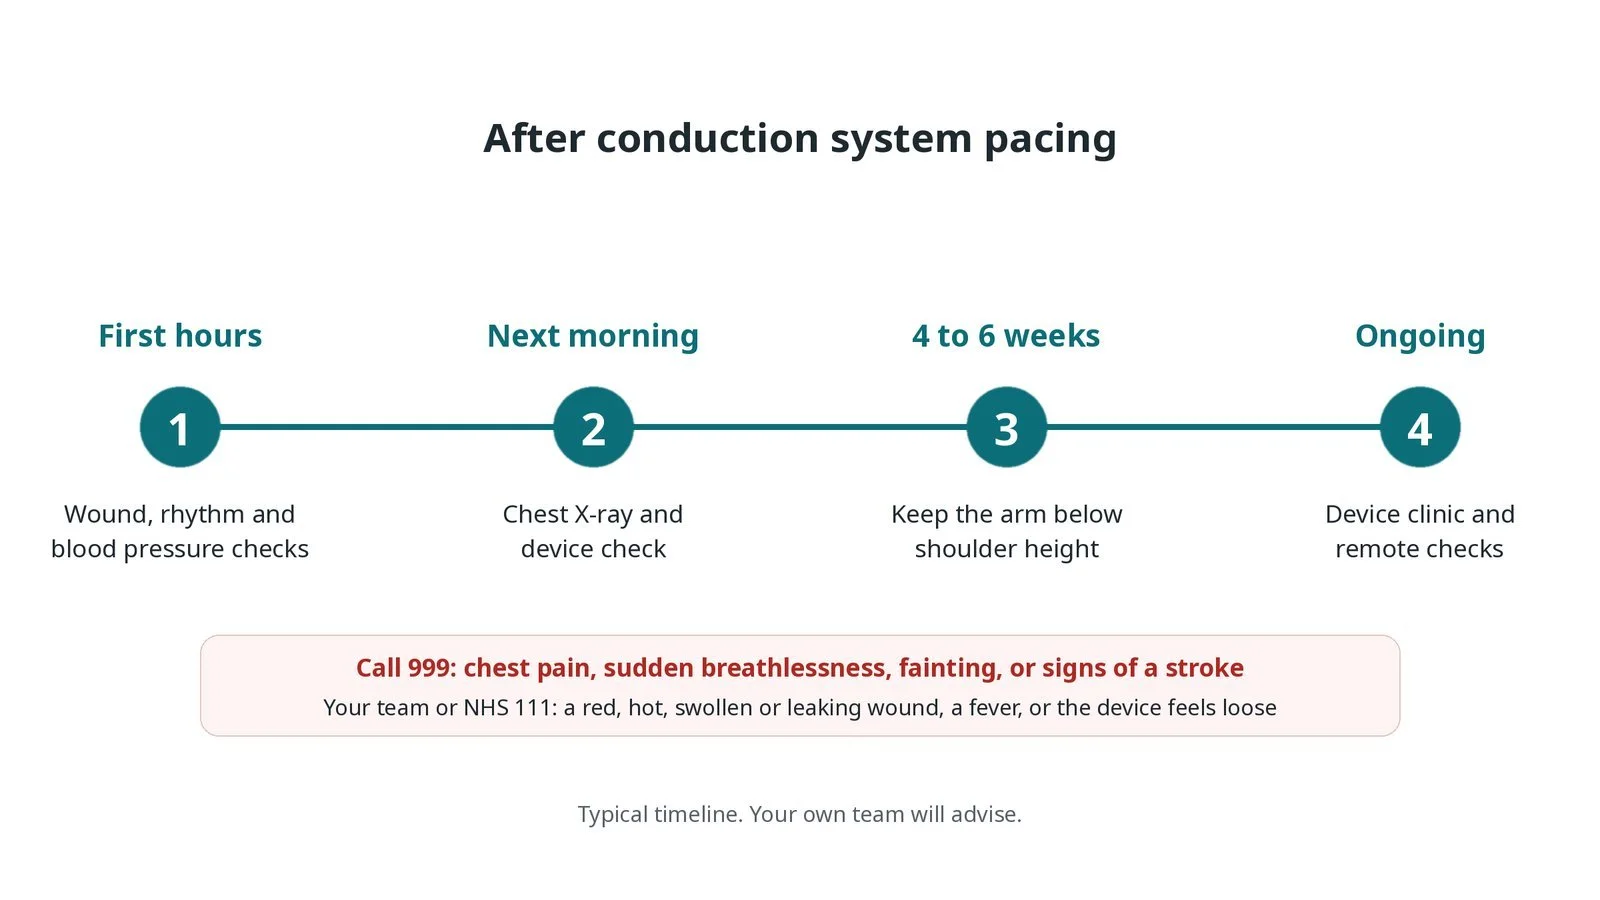
After conduction system pacing: (1) wound, rhythm and blood pressure checks; (2) chest X-ray and device check; (3) arm below shoulder height for 4 to 6 weeks; (4) device clinic and remote checks.
Risks and complications
Your team will explain the risks that apply to you. Possible problems include:
Bleeding or a bruise (haematoma) at the wound
Infection (uncommon)
The lead moving or its threshold rising, needing a repeat procedure (uncommon)
Lead going through the septum into the left ventricle (uncommon): Usually recognised and repositioned during the case.
Collapsed lung (pneumothorax) (uncommon)
Bleeding around the heart (rare)
Cath lab kit list (printable)
Barts example kit list
An example from one UK centre, written generically. Every lab has its own protocol, and sizes and doses vary.
pacemaker implant pack, sterile drapes and skin prep
venous access needle, wires and peel-away sheaths
shaped delivery sheath for conduction system pacing, per operator
conduction system pacing lead (lumenless or stylet-driven), per operator
right atrial lead
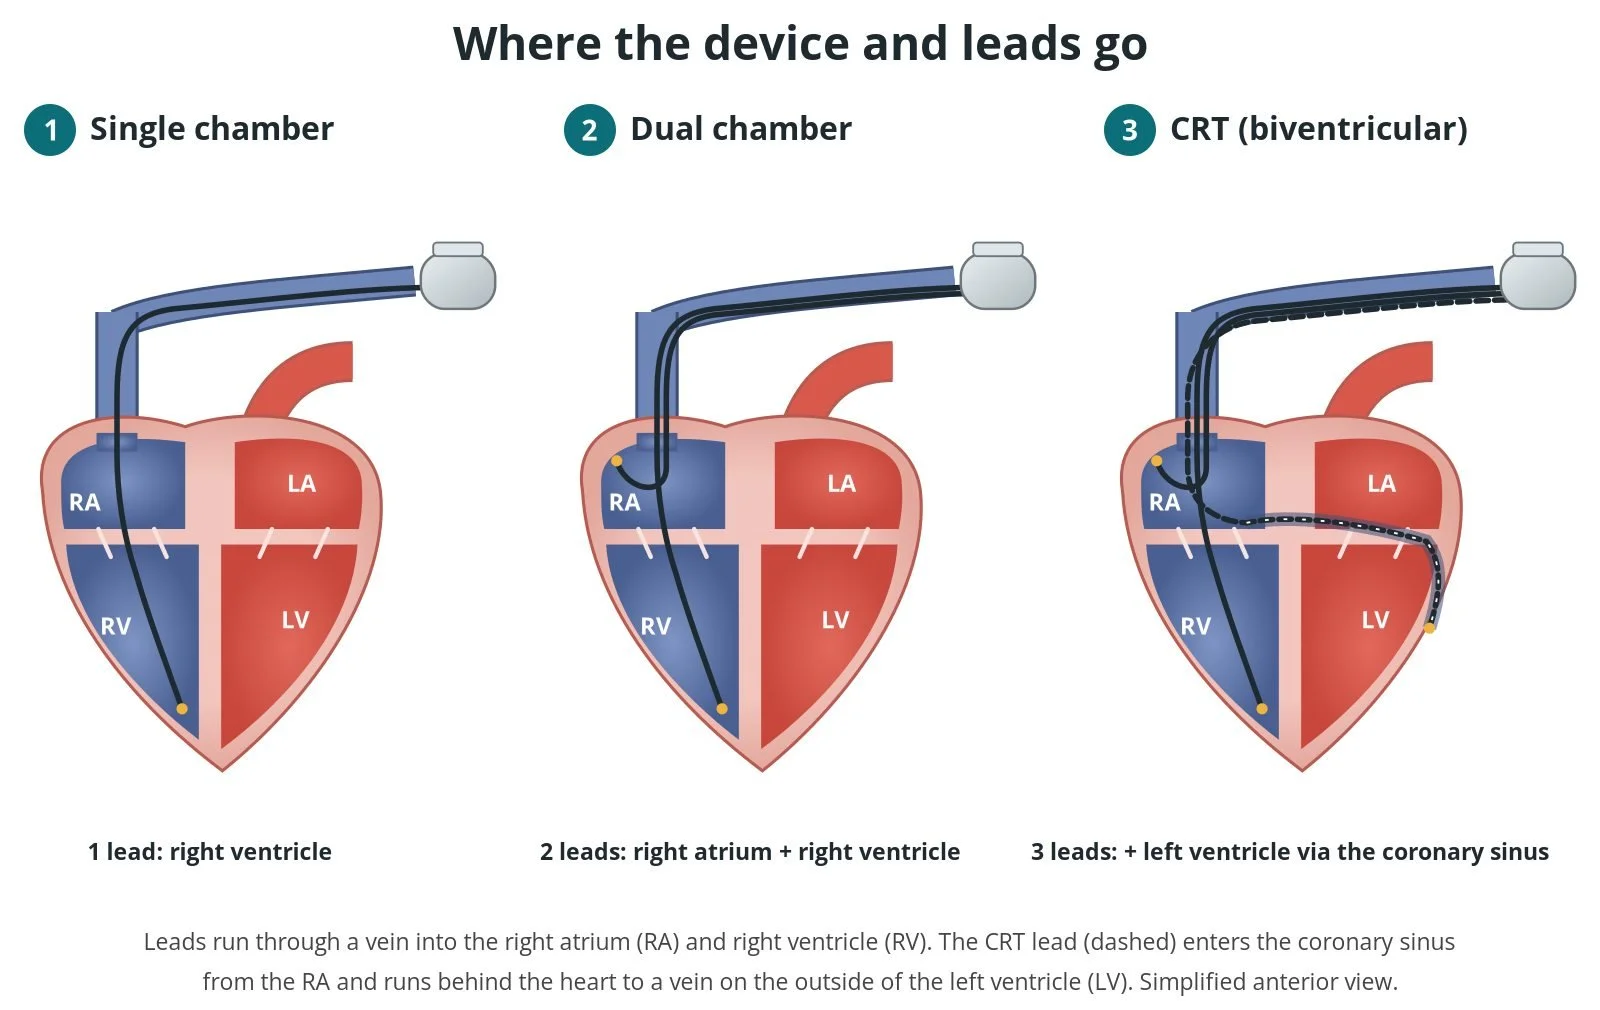
pacemaker or CRT generator
pacing system analyser and 12-lead recording system
contrast for the septogram
slitting tool for the sheath
standard right ventricular lead as a back-up
Procedural steps (Barts example)
Getting ready
Access
Placing the lead
Atrial lead and generator
Checks before home
First time in the cath lab?
The ECG is the target. The operator stops turning when the paced QRS and timings look right. Keep the 12-lead clean and visible.
Count the turns. Some operators like the number of turns called out. Ask before the case.
Watch impedance. A sudden drop can mean the tip is through the septum. Say it out loud.
Be ready for plan B. A standard lead or a CRT lead may be needed if the target cannot be reached.
Check that all 12 ECG leads are clear before the case starts. The paced QRS is judged on them.
Call out impedance and paced QRS changes clearly. They guide when to stop turning.
Have a standard pacing lead and sheath ready in case the conduction system cannot be reached.
FAQ
Is this different from a normal pacemaker?
The box and the operation are the same. Only the position of the ventricular lead is different.
Why is it better?
Pacing through the heart's own wiring keeps the two ventricles squeezing together, which may protect heart function when a lot of pacing is needed. Research is ongoing.
Does it take longer?
It can take a little longer than a standard implant, as the lead position is checked carefully.
Can it replace CRT?
For some people with heart failure it is an option. Your team will explain which is best for you.
Related Cath Lab 101 guides
Cardiac resynchronisation therapy (CRT-P and CRT-D) (coming soon)
AV node ablation (ablate and pace) (coming soon)
Sources
All checked on 12 November 2026. Each page's own date is shown where it gives one.
Glikson M, et al. 2021 ESC Guidelines on cardiac pacing and cardiac resynchronization therapy. Eur Heart J 2021;42(35):3427–3520
European Society of Cardiology (EHRA). Clinical consensus statement on conduction system pacing, 2025. escardio.org
Burri H, et al. EHRA clinical consensus statement on conduction system pacing implantation. Europace 2023;25(4):1208–1236
StatPearls (NCBI Bookshelf), search: left bundle branch area pacing. ncbi.nlm.nih.gov/books
Disclaimer
Education only. This page is for general education for healthcare students, cath lab staff and curious readers. It isn't medical advice and doesn't replace advice from your own doctor, heart team or local unit protocols. Equipment and medicines are described generically. No product or manufacturer is recommended. If you think someone is having a heart emergency, call 999.
Disclosure: I work for a company that makes a device used in this procedure. This page is independent education, isn't sponsored or reviewed by any company, and doesn't recommend any product.
All diagrams on this page are original illustrations created for rodnieoro.com.