
TransAxillary Approach TAVI
TransAxillary Approach TAVI
SMALL TROLLEY:
4F, 6F Femoral Sheath
8F long sheath (for axillary)
8F dilator
6F Pigtail Catheter
6F JR4 Catheter
5F AL1 Catheter
Merit micropuncture kit
Medtronic Amplatz gooseneck microsare 7mm loop
Safari Wire
2 Proglides (1 proglide and 8F angioseal for MM)
0.018” x 400cm PLYWIRE (PTFA coated Nitinol guidewire)
Occlusion Balloon (Medtronic Admiral extreme 0.035” x 130cm length (6-10mm x 20mm)
Inflator device
Hemostasis valve (Y-connector)
RadPad over left shoulder
20ml 1% Lidocaine
20ml 0.5% Bupivacaine
10ml Heparin
1:1000 Adrenaline
BIG TROLLEY (VALVE CRIMPING):
3-way tap
60mL luerlock syringe (for de-airing)
30mL luerlock syringe (for flushing)
Contrast 15mL/Saline 85mL
A pair of Scissor and forceps (borrow from small trolley)
2 Bowls of Saline for soaking valve (minimum of 1 minute each bowl)


ACCESS:
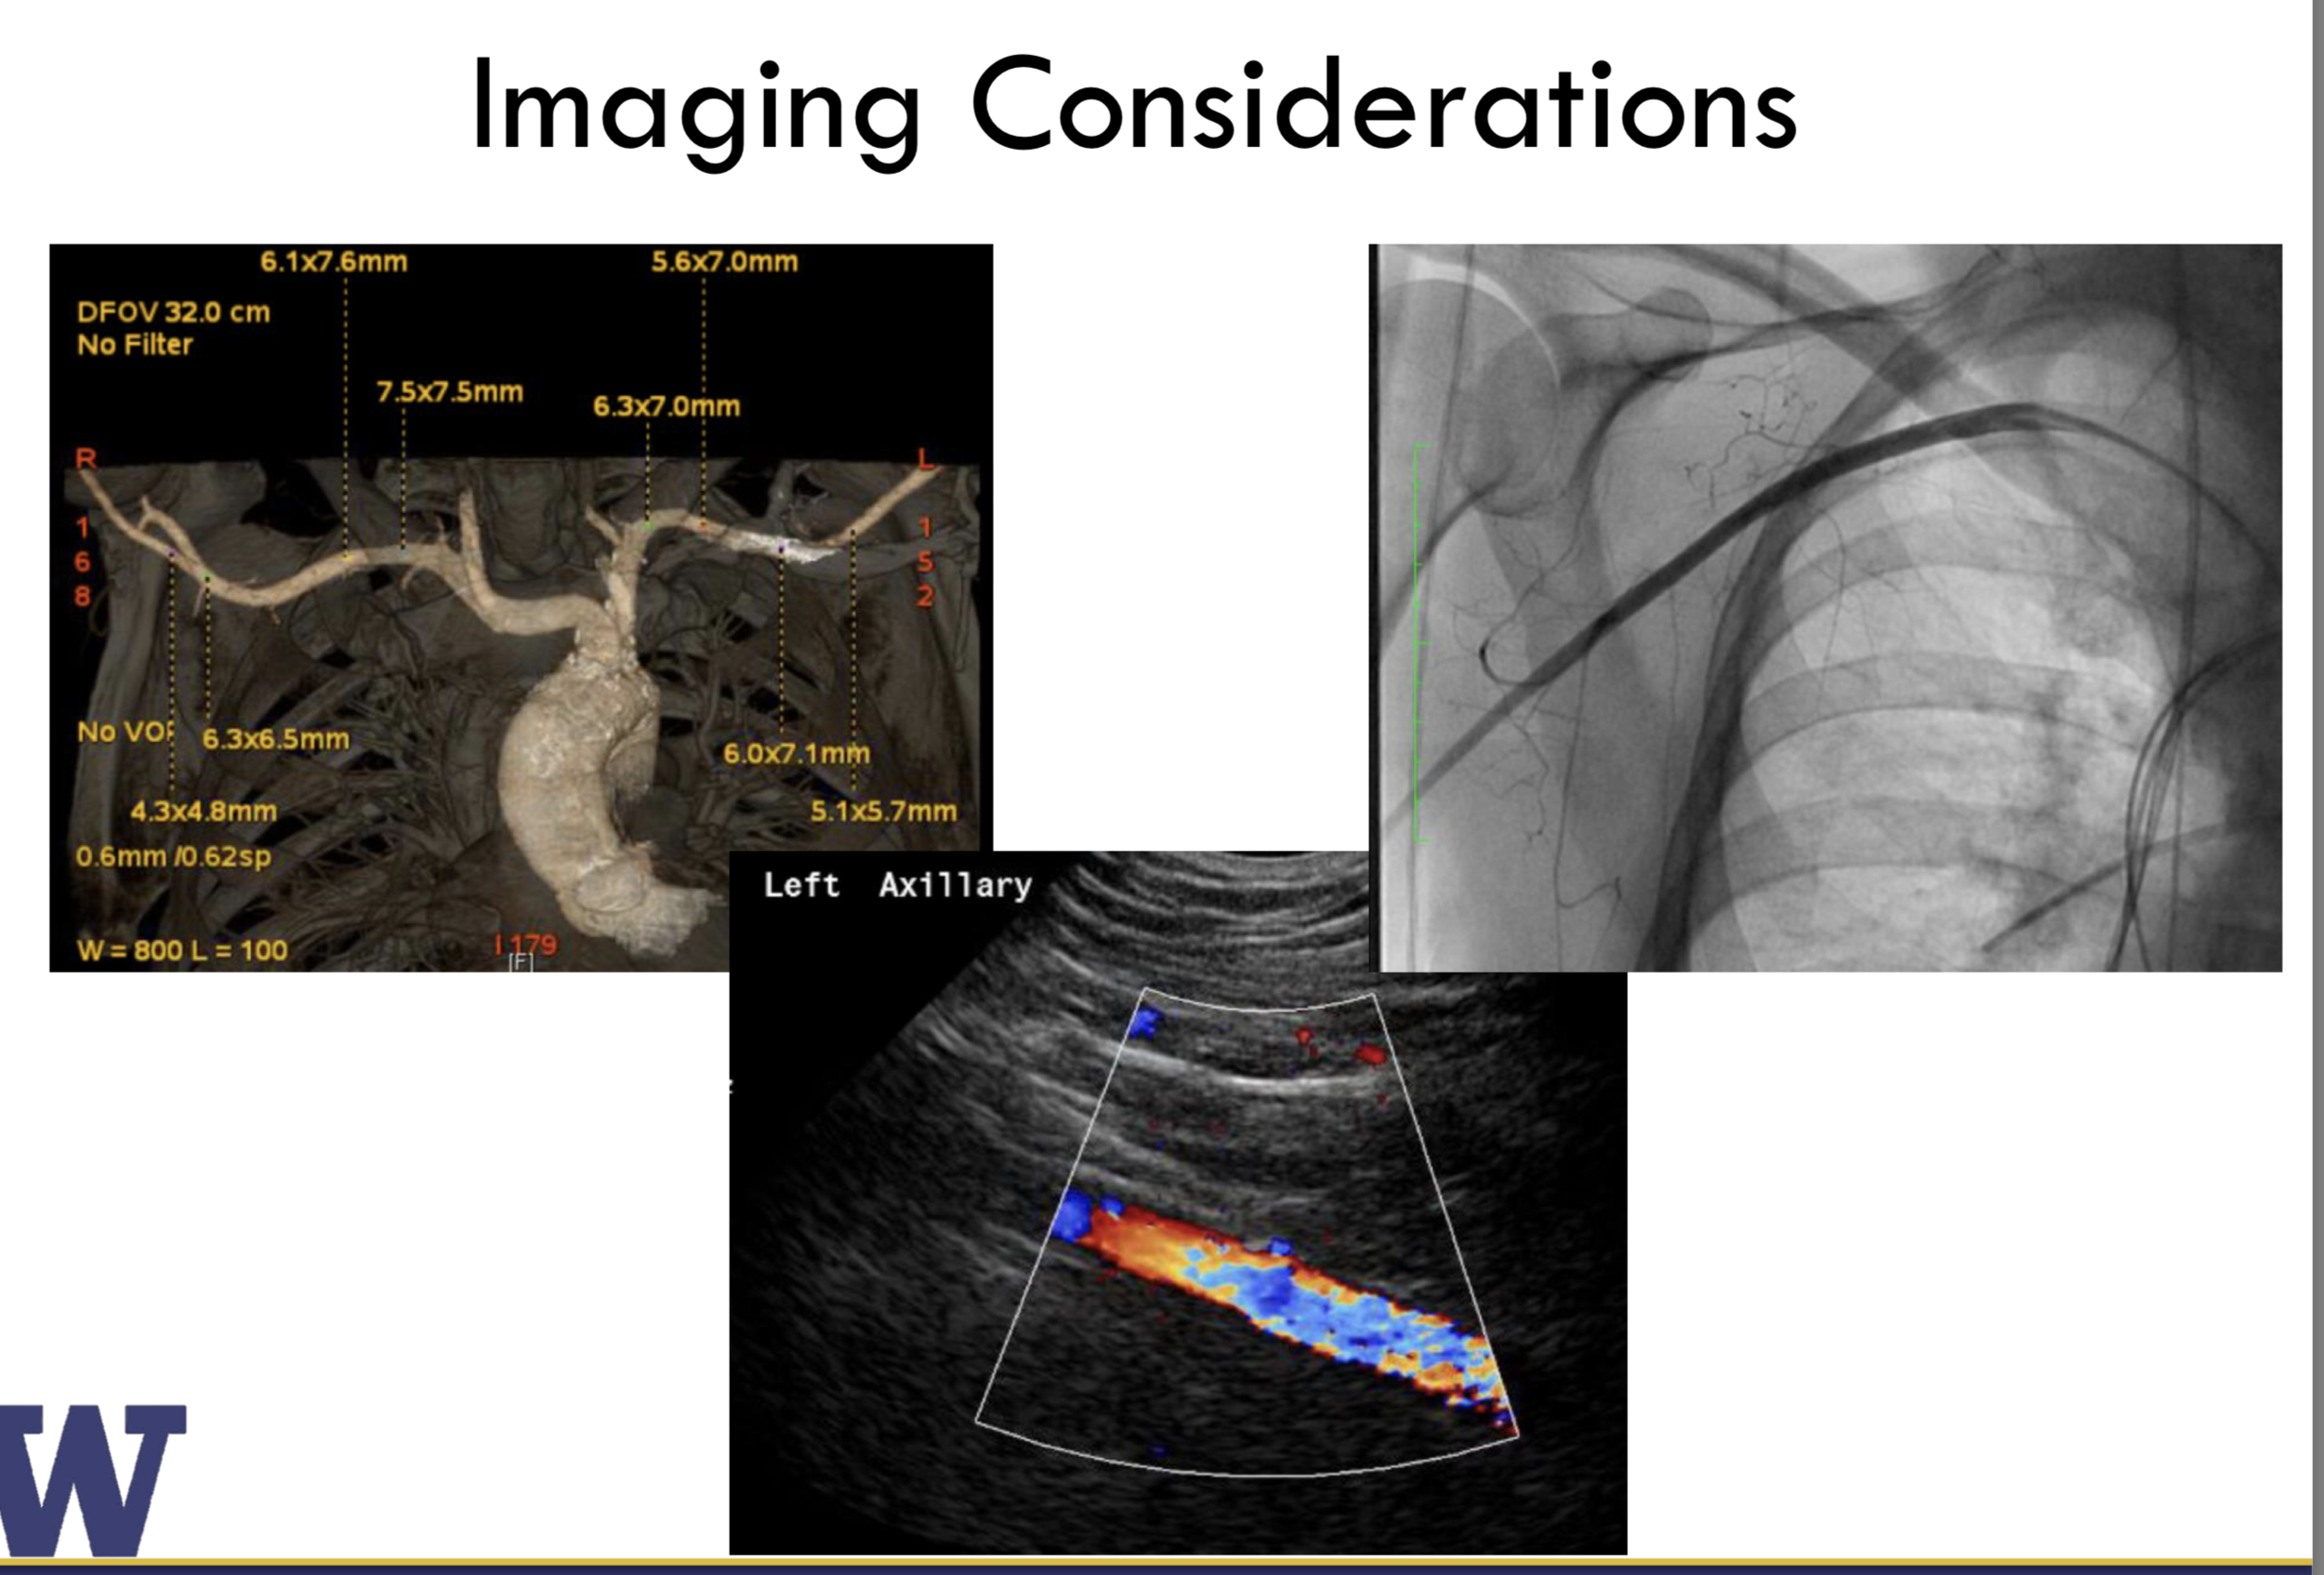
6 Fr femoral access is obtained and left axillary angiogram is performed using 6F JR4 diagnostic catheter through engaging the left subclavian artery.
A 260 cm 0.018” Platinum Plus wire (or equivalent) is directed into the distal left brachial artery and the JR4 is removed leaving the wire in place.
This step ensures vascular protection and also serves as a fluoroscopic marker for percutaneous puncture. In the absence of adequate femoral access, ipsilateral radial access may be obtained but is less ideal as retrograde angiography is less revealing and bailout strategies are restricted.
Half dose heparin should be provided at this juncture.

Fluoroscopic view with metallic scissors aligned with the left axillary artery (0.018” wire as fluoroscopic marker). The course of the left axillary artery is then marked on the surface of the skin by tracing alongside the clamp.
A metallic instrument on the skin is then used to outline the course of the artery relative to the 0.018” wire by fluoroscopy.
Tracing a line on the skin along the instrument reflecting the course of the wire will help the operator remember to puncture with a cranial bias (typically towards the patient’s contralateral ear).
Micropuncture access is then performed using the modified Seldinger technique, with fluoroscopy and ultrasound guidance.
Generally, skin puncture is performed just medial and inferior to the shoulder prominence in the deltopectoral grove.
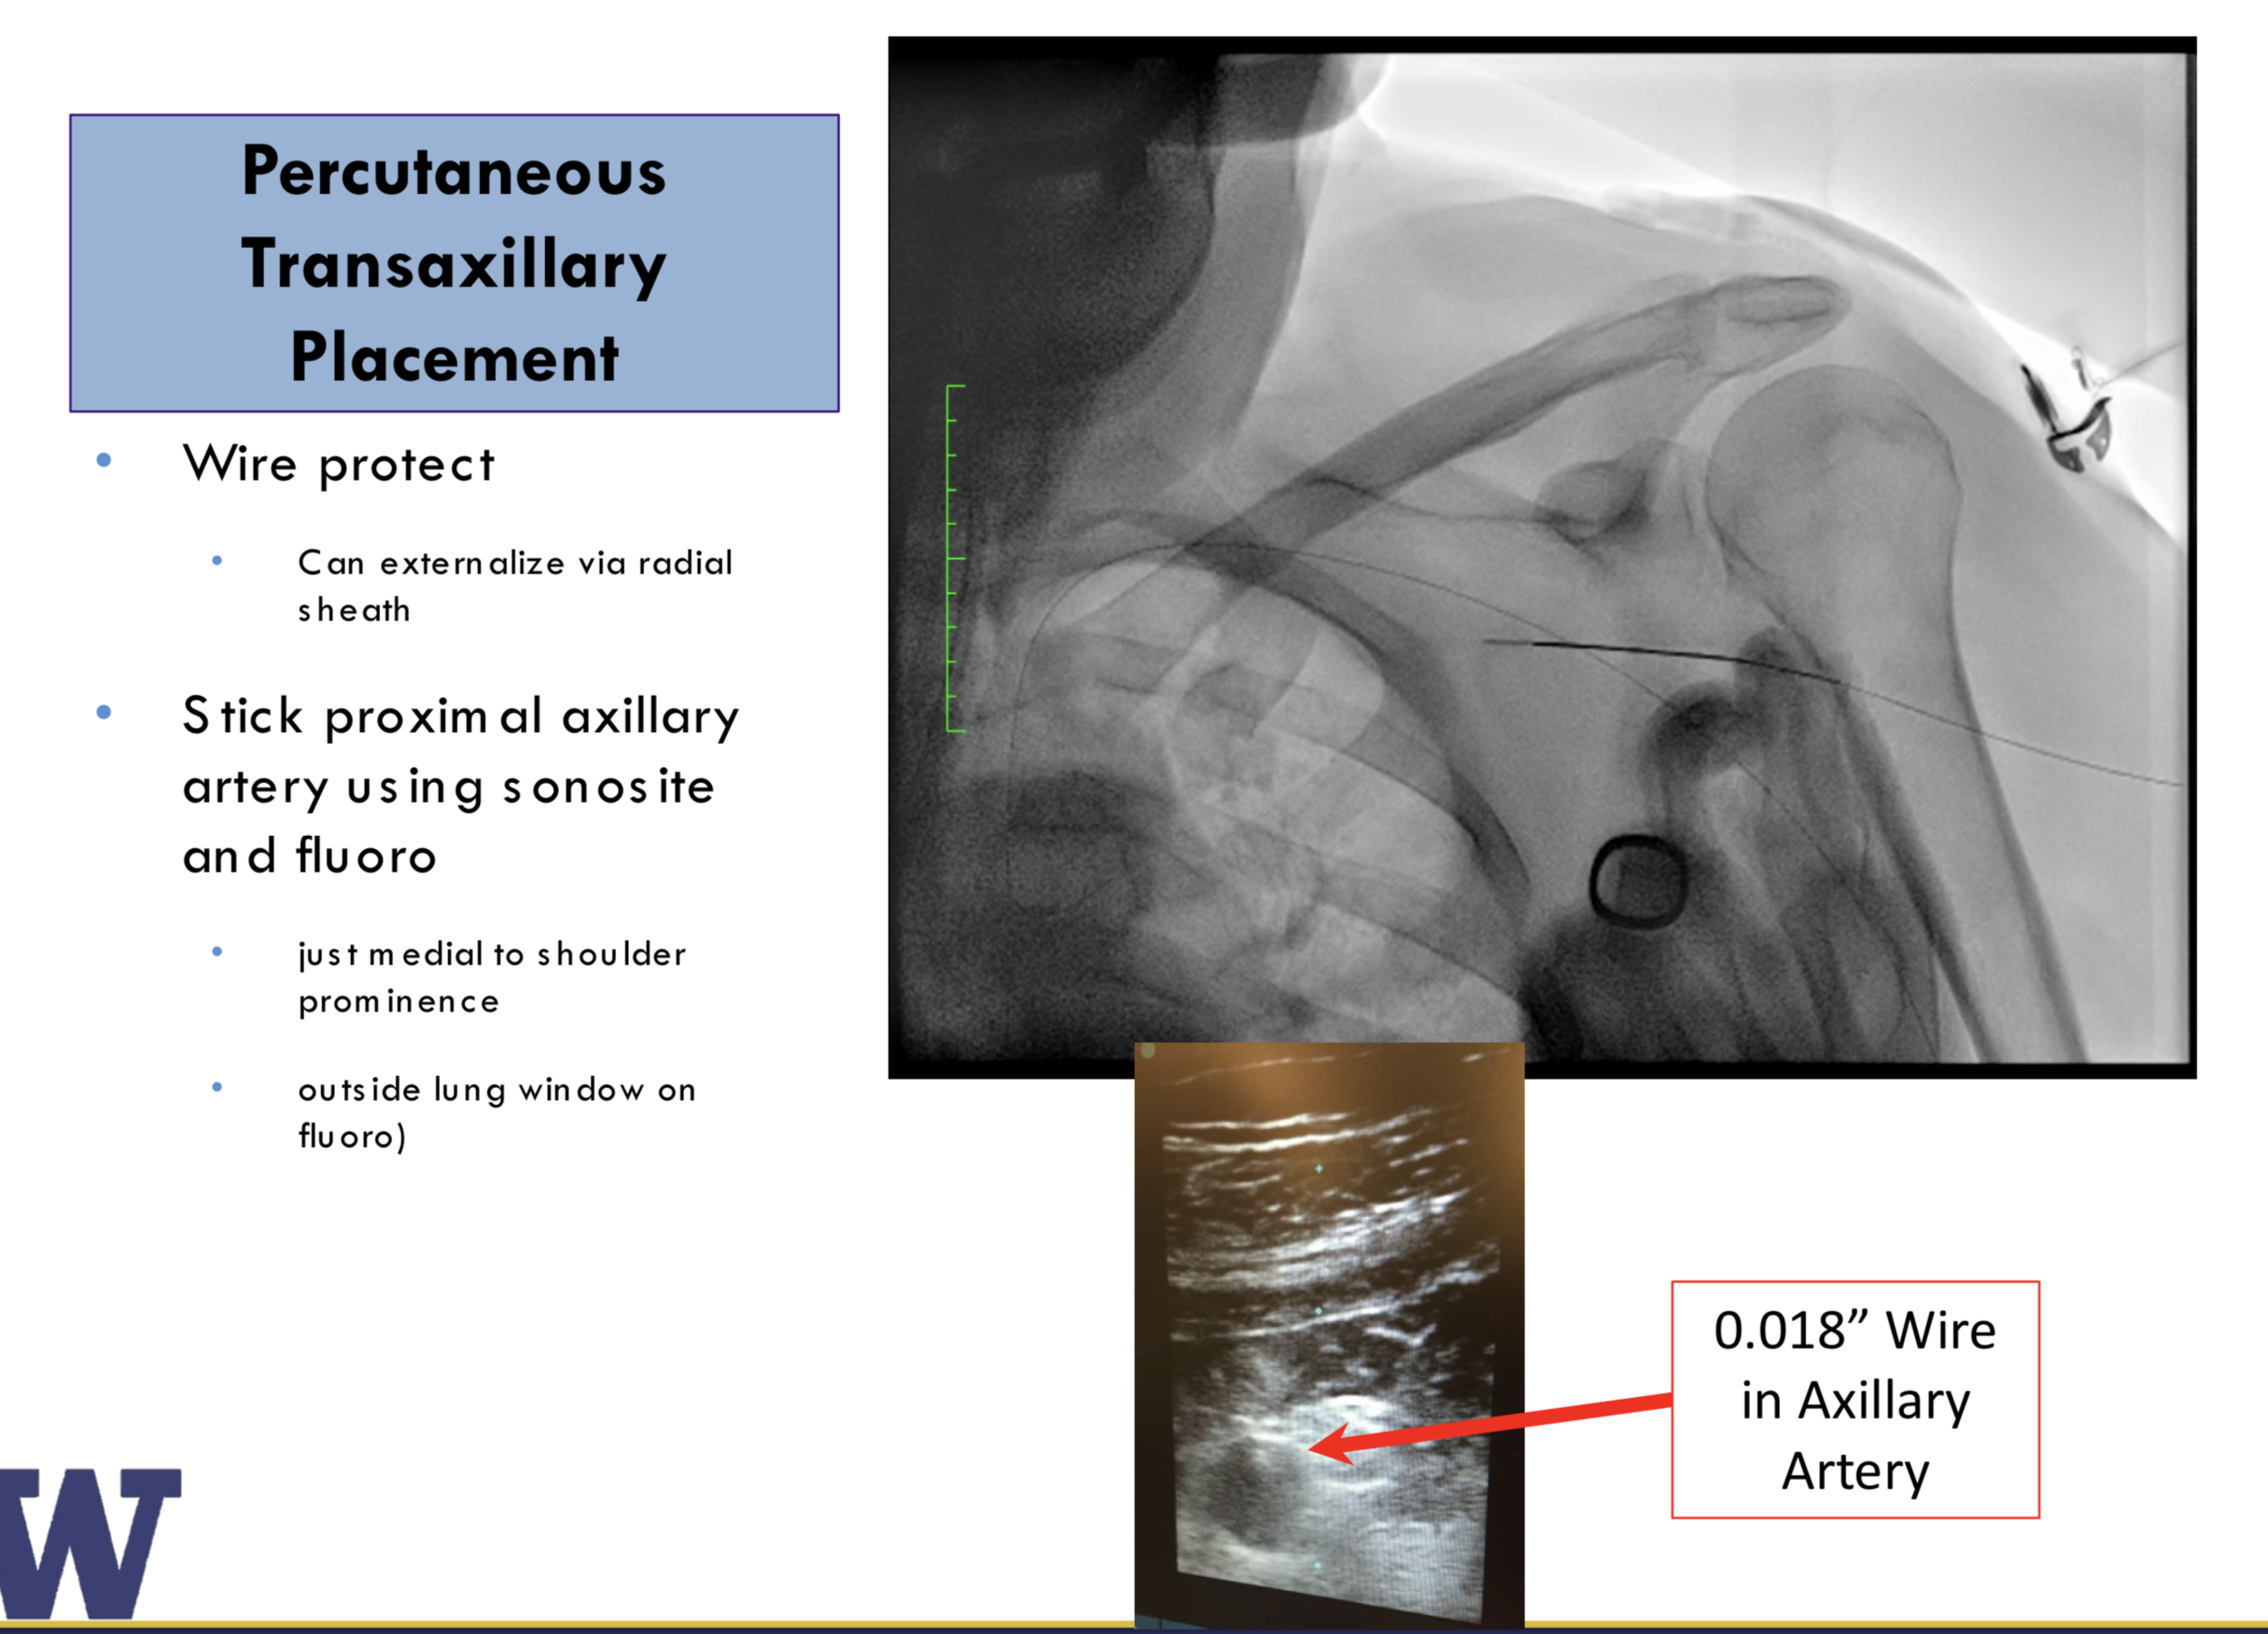
Fluoroscopic view showing micropuncture needle entry into left axillary artery. The tip of the needle is seen just lateral to the border of the 2nd rib. Puncture at this location is advantageous for manual compression if needed. A puncture too proximal to the clavicle can create a difficult transition under the clavicle and above the rib in thin individuals.

A small, 5–6 mm incision is made at the access site and the subcutaneous tract is dilated with a hemostat followed by a 6F dilator. The arteriotomy can safely be managed using a vascular pre-closure technique using 2 Proglides.
Importantly, these Perclose devices are deployed with the 0.018” wire in place. Trapping this wire within the Perclose knots is possible though rare. Further discussion on this topic will be provided later.
Advanced Perclose users will note that the vessel does not feel as “rubbery” on pullback after the footplate is deployed. Gentle manipulation of the Perclose device in the axillary is therefore recommended.
Between catheter and device exchanges, manual pressure should be held medial and superior to the arteriotomy (typically just below the clavicle).
Additionally, a 6–10 mm, 0.035 inch-lumen peripheral balloon with ≥130 cm shaft sized to match to the diameter of the subclavian 1:1 may be positioned in the proximal subclavian artery over the 0.018” wire and inflated at low pressure (1–3 Atm) during catheter exchanges to provide temporary hemostasis.
We no longer find this step necessary for routine catheter exchanges given the efficacy of manual pressure. If balloon hemostasis is used, the plethysmographic waveform can be monitored for obliteration to ensure an adequate occlusion when inflating the angioplasty balloon.

SHEATH INSERTION
Following access and pre-closure, an 8 Fr sheath is then placed in the arteriotomy through which a standard catheter (AL1, JR4, etc.) is used to cross the aortic valve. We prefer crossing the aortic valve prior to TAVR sheath or delivery catheter insertion as these sheaths are relatively long for this access point and will hang outside the body (making preceding steps ergonomically challenging for operators).
After crossing the aortic valve, standard hemodynamics are measured, followed by placement of a stiff wire in the left ventricle.
The 8 Fr sheath is then removed and the axillary arteriotomy is dilated to prepare for placement of the TAVR sheath or delivery of the Evolut system sheathless. A peripheral balloon may be used here to provide temporary hemostasis as described above. Sheath insertion must be performed carefully under fluoroscopy to avoid trauma at the subclavian flexure.
In case of the Edwards E-sheath, the logo is faced towards the patient’s head (sidearm towards the bed) per company recommendations to orient the seam towards the primary curvature of the subclavian, though this does not appear to be critical. The sheath should be delivered into the ascending aorta.
The dilator may be removed while carefully leaving the wire in place. Kinking of the sheath at the subclavian curvature following dilator removal is possible though not common and easily overcome during valve delivery using a “push-pull” technique.
For Medtronic Evolut-R, a sheathless insertion is recommended with special attention paid to ensure the nose cone does not separate from the capsule around the flexure of the subclavian, a scenario that can increase the risk of subclavian injury.


TAVR valve deployment
Device deployment is relatively unchanged compared to transfemoral access with the exception of loading the valve on the balloon in the case of the Edwards SAPIEN 3 valve. This step is performed in the ascending aorta. At the point at which the valve is seen to exit the tip of the sheath under fluoroscopy, the nose cone of the delivery system is likely to already be across the native aortic valve.
is does not appear to cause significant issues and loading of the balloon into the valve will draw the nose cone back into the ascending aorta. To create more room for valve loading, the E-Sheath may be drawn back into the proximal subclavian ostium but only after the valve has been advanced into the ascending Aorta. Valve deployment proceeds in usual fashion from this point forward.


Closure
Following satisfactory valve deployment, the delivery system is removed. The peripheral angioplasty balloon should be advanced to the proximal subclavian and inflated during sheath removal for “dry field closure”.
The Proglide sutures should be cinched after the sheath is completely removed. After the perclose sutures are cinched down, we perform final angiography of the vessel through the end-hole of the peripheral balloon with the wire still in place by adding a Co-Pilot to the end of the balloon and injecting through it after tightening the valve on the end of the Co-Pilot in clockwise fashion.


Complication management
If complete hemostasis is not achieved, as with femoral access, further options include deployment of a third Proglide device, endovascular tamponade across the arteriotomy site with the peripheral balloon (typically for 3–5 minutes), or external manual compression in combination with protamine administration.
If the peripheral balloon cannot be advanced to the access site, consider that the 0.018” wire may have been trapped under the perclose suture (since it was in place during deployment). A buddy wire should then be advanced past the access point to the brachial artery and ready delivery of the balloon to the arteriotomy on the second wire confirms that the first wire is trapped under the Perclose suture and should be removed (we have found this to be quite rare).
If these options are ineffective, stent grafting (our preference of a 0.018” Viabhan system requires femoral sheath upsizing to 7 Fr) or open surgical repair may be pursued. Covered stent graft durability in this location may be rightly questioned as compression between the second rib and clavicle can ultimately lead to fracture or stenosis though its immediate efficacy is quite good.
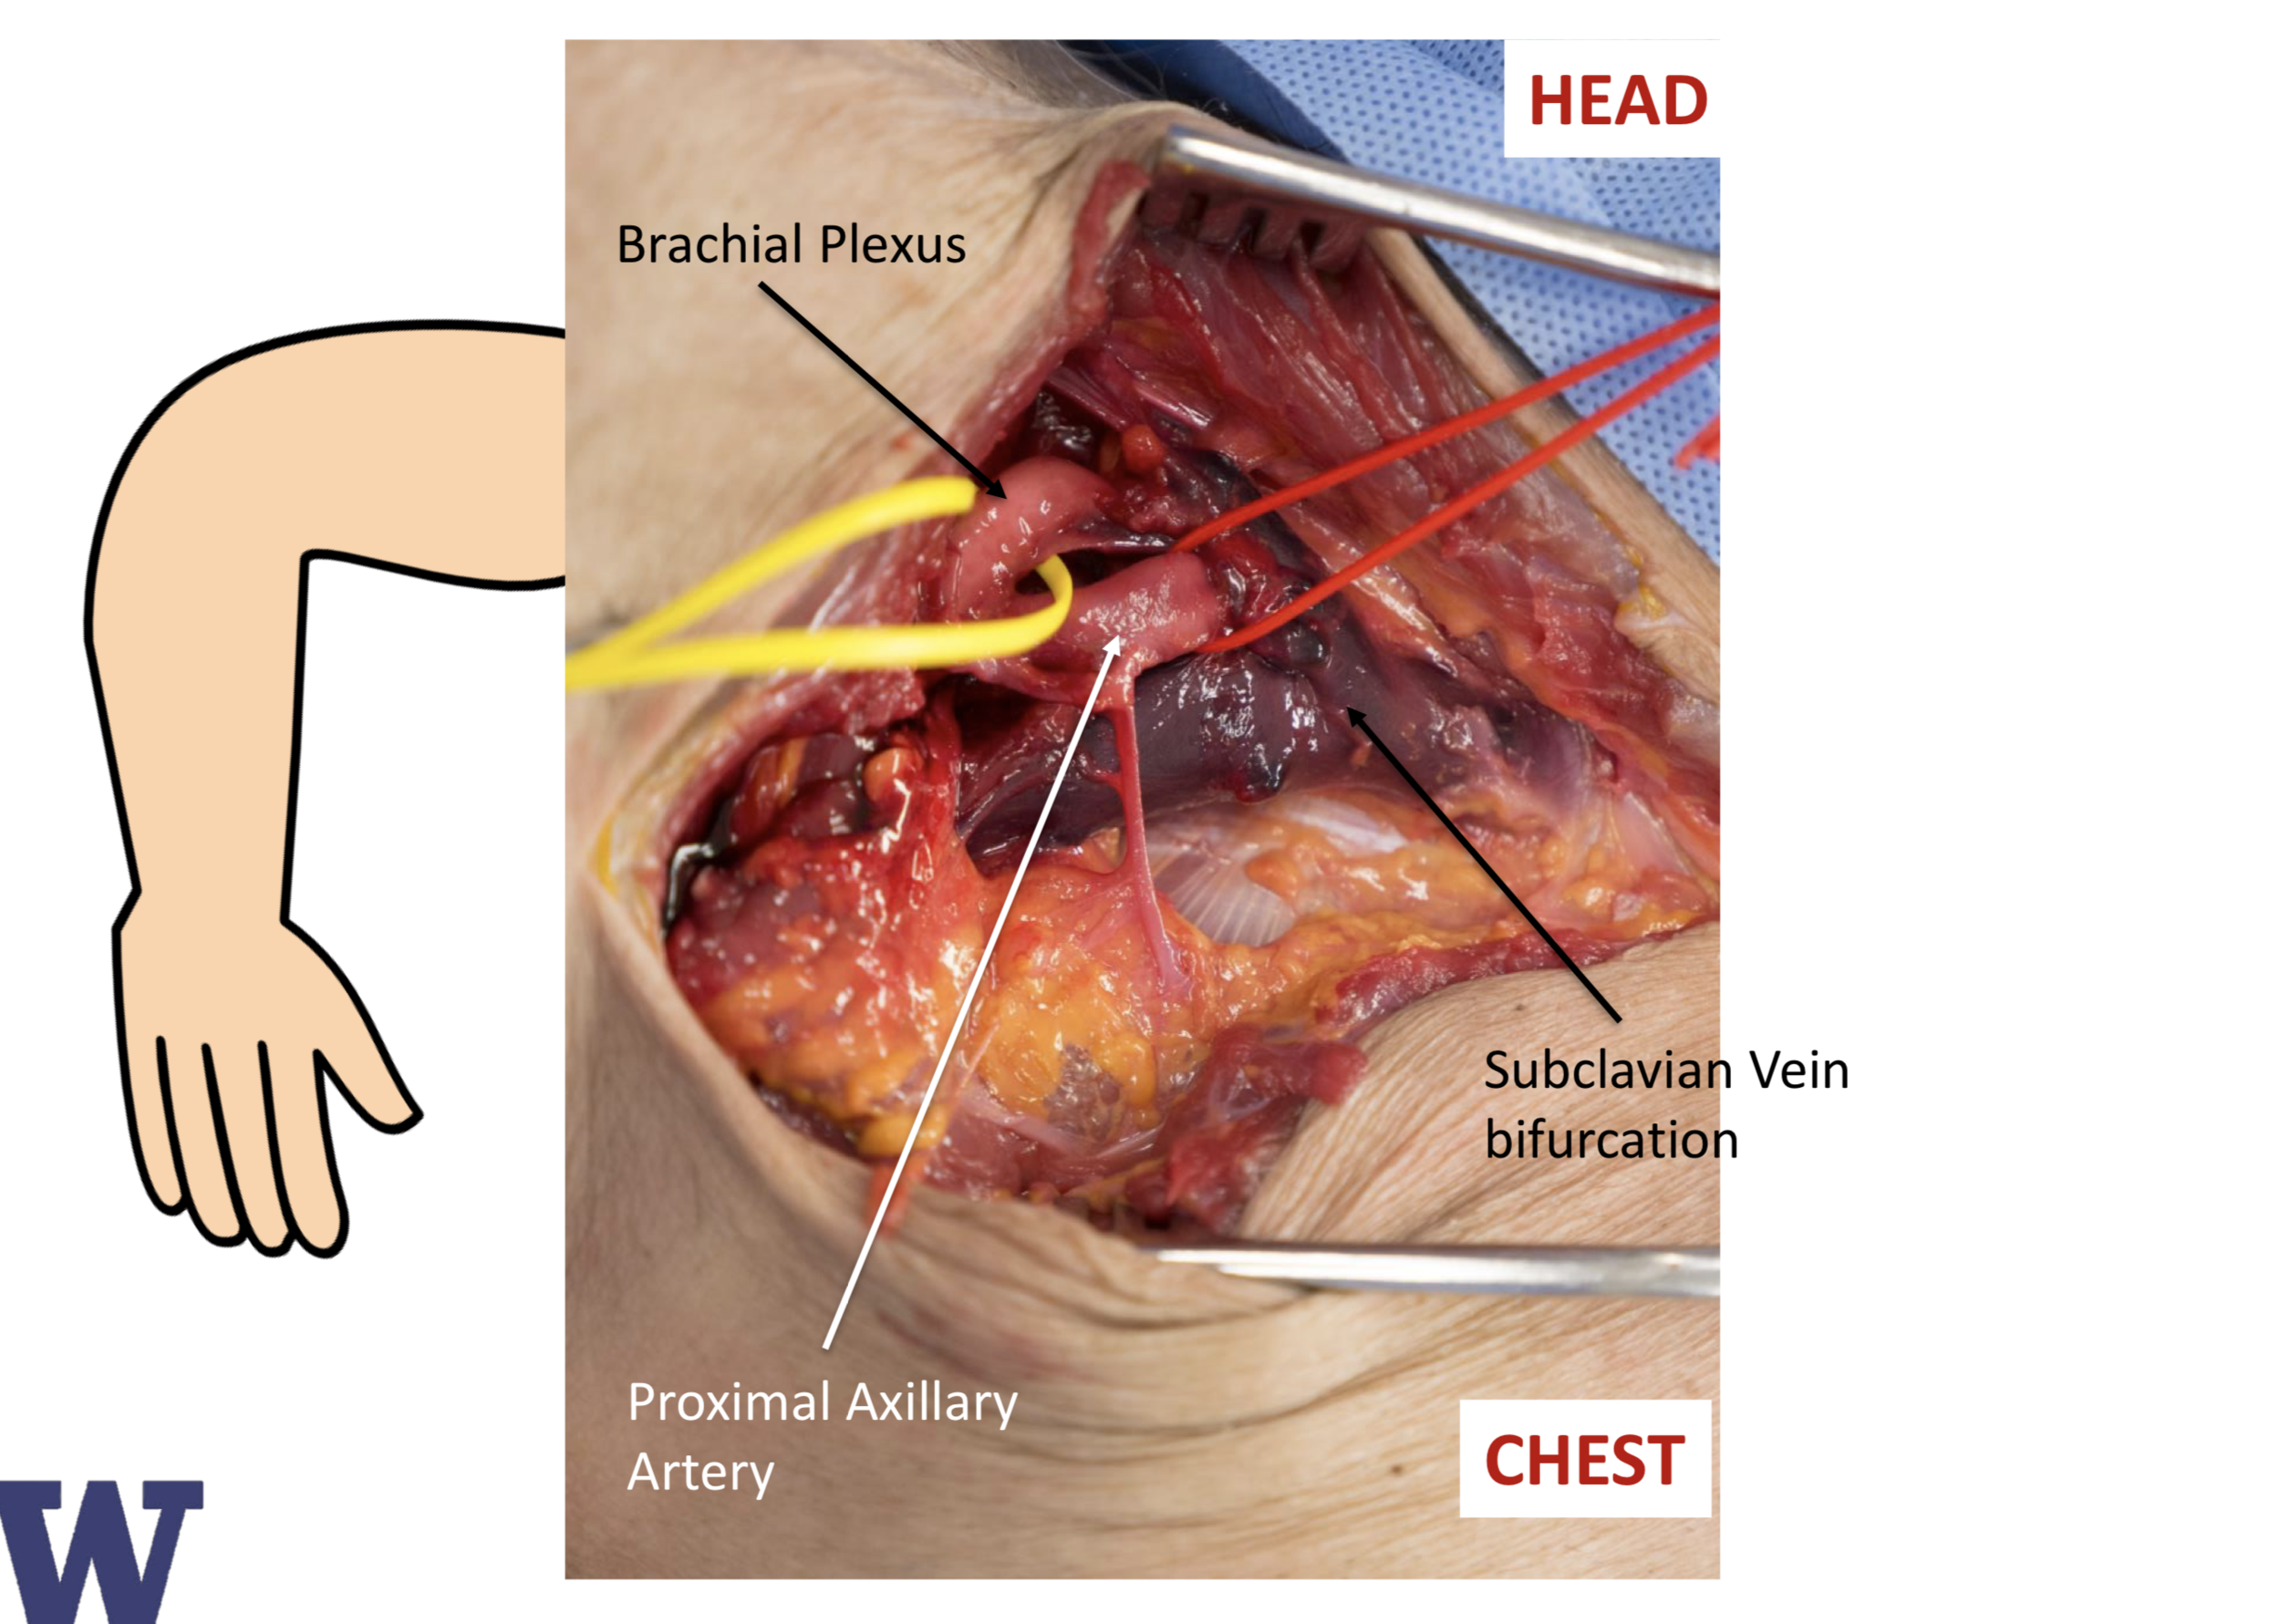
This option should therefore be reserved for worst-case scenarios. In the setting of surgical repair, balloon tamponade should be maintained to provide the surgeon with a dry field to minimize the possibility of inadvertent injury to the brachial plexus.

AXILLARY ACCESS TECHNIQUE
Drape patient (as per surgical subclavian cases, both groins also prepped)
SaO2 probe on left hand (so efficacy of subclavian balloon occlusion can be assessed)
Prepare sterile table on either side of patient (one on patient’s left side, chest level at 90 degrees; one on patient’s right side, usual position) in addition to valve prep table.
Initial steps performed by team from patient’s right side (usual side)
LRA, 6Fr
RRA, 5Fr (for pig) – can use femoral for pig but requires multiple additional catheter exchanges
RFA or LFA, 6Fr (ultrasound, micropuncture)
(RFV or LFV, 5Fr for TPW – if using)
Half dose heparin
5Fr JR4 from leg up to left subclavian
Pass Plywire from JR4 down arm.
5Fr JR4 up from LRA. Microsnare up JR4, snare wire & externalize (if LRA not negotiable eg. loop then left brachial micropuncture with single Proglide to close)
Angiogram of left subclavian/axillary with wire in place and forceps on skin
Mark wire position on skin (as using US might just mark puncture point)
Remove JR4
Pass occlusion balloon from femoral and position in subclavian
Implanting operators now move to left side of patient and screens moved to top end of patient (need stool to move ceiling ducting)
Position Radpad over left shoulder
Micropuncture/US puncture axillary artery. Selective shot to confirm position
Skin incision / dilate tract
8Fr dilator (consider balloon inflation during sheath swaps – doesn’t seem necessary)
2x Proglides
Back with 8Fr sheath
IMPORTANT - * check that balloon will pass arteriotomy (ie. Proglides have not trapped wire). If not, retract Plywire and rewire/snare. *
Pig to aortic valve from RRA. Aortogram
Cross valve with AL1/straight
Pig then Safari
Inflate balloon in subclavian during following steps (2-4 Atm)
Insert E-sheath into vessel whilst screening
Once sheath in vessel, deflate & retract balloon into desc aorta
Give rest of heparin
Ask for valve to be prepped
(Position TPW – if using)
Implant TAVI (nosecone into LV first then mount valve on balloon in asc aorta)
Pull back E-sheath into subclavian
Advance and inflate balloon (2-4 Atm) in subclavian.
Remove sheath and tie Proglides.
If using 0.035” balloon over 0.018” wire then inject down balloon lumen using O-ring to confirm haemostasis
Alternatively pass 5Fr JR4 catheter up from LRA over Plywire into subclavian and inject through O-ring/Superketch) to confirm haemostasis
If ongoing bleeding consider:
· Passing balloon up to arteriotomy and inflating to tamponade
· Extra device – Proglide/8Fr Angioseal
· Viabahn implantation – requires 7-9Fr femoral introducer sheath. Care with upsizing on 0.018” Plywire.
· Protamine (not given routinely given kit still in subclavian)
Once haemostasis achieved, consider giving Protamine anyway to reduce risk of rebleed.
Kit list
1) Vascular access sheaths – 7-9Fr
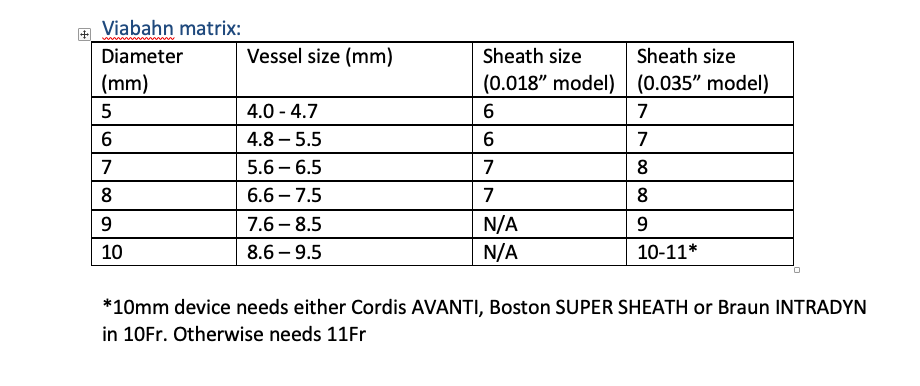
2) Viabahn in correct size – 120cm shaft, 50mm length. See below.
3) Balloons – 130cm Medtronic Admiral Xtreme 0.035” 20mm length (6-10mm diameter)
4) Snare – Medtronic Amplatz Gooseneck microsnare 7mm loop
1) Introducer sheath
Destination
7Fr 90cm
8Fr 90cm
No 9Fr - use standard long sheath
2) Viabahn
https://www.goremedical.com/eu/products/viabahn---specifications
We stock:
120cm shaft 0.018” 5cm 7mm (7 French sheath)
120cm shaft 0.018” 5cm 8mm (7 French sheath)
120cm shaft 0.035” 5cm 9mm (9 French sheath)
Length – 120cm or 75cm
Wire compatibility:
· 0.018” : 5-8 mm diameter only; 8mm treats vessel size of 6.6-7.5mm
· 0.035” : 5-13mm diameters available
Length- 2.5, 5.0, 10, 15, 25mm
3) Balloons
125cm Medtronic Evercross or 130cm Admiral Extreme
0.035” compatible (allows injection down lumen)
20mm length 6-10mm all 6Fr sheath compatible
Cheap as chips
New covered stent – balloon expandable
http://www.bardlifestream.com/
6Fr guidesheath compatible up to 8mm diameter
80cm or 135cm length
Available In UK Cost £1141. Not sale or return

Other options
Advanta V12 covered stent (Atrium make /Maquet distribute) – called iCast in USA
Has 120cm length shaft. 6-7Fr sheath compatible. 0.035” wire
Lengths: 16, 22, 38, 59. Diameter 5-12
Summary
Main kit needed for axillary:
1) Merit micropuncture kit
2) 4m Plywire 0.018” (OptiMed)
3) Viabahn in correct size – 120cm shaft, 50mm length. See chart below.
4) Femoral sheath large enough to pass Viabahn
5) Occlusion balloons to pass from femoral – we use 130cm Medtronic Admiral Xtreme 0.035” 20mm length (6-10mm diameter)
6) Shorter balloons to pass from radial – not always needed, we use Evercross 80cm
7) Snare – Medtronic Amplatz Gooseneck microsnare 7mm loop