Leadless pacemaker retrieval (extraction): a Cath Lab 101 guide
Reviewed by Rodnie Oro, cath lab charge nurse · Last reviewed: October 2026 · Education only, not medical advice
Leadless pacemaker retrieval in one minute
What it is: a leadless pacemaker is a small capsule, about the size of a large vitamin pill, fixed inside the right ventricle, with no wires (leads) or chest pocket. Retrieval (extraction) removes it, using a snare passed through a large sheath in the femoral vein in the groin.
Who it is for: people whose leadless pacemaker needs removing, for example because it has moved, is not working properly, the battery is running out and the team chooses removal, or a different device is needed, as decided by a heart rhythm specialist.
Main risks: damage to the heart wall or tricuspid valve, fluid around the heart, heart rhythm problems, and bleeding at the groin. Your team will explain your own risk.
Usually: under local anaesthetic with mild sedation (sometimes general anaesthetic), about 1 to 2 hours, often home the same or next day.
On this page: What is leadless pacemaker retrieval? · Who is it for? · When is it done? · Step by step · Recovery · Risks · Kit list · First time in the lab? · FAQ
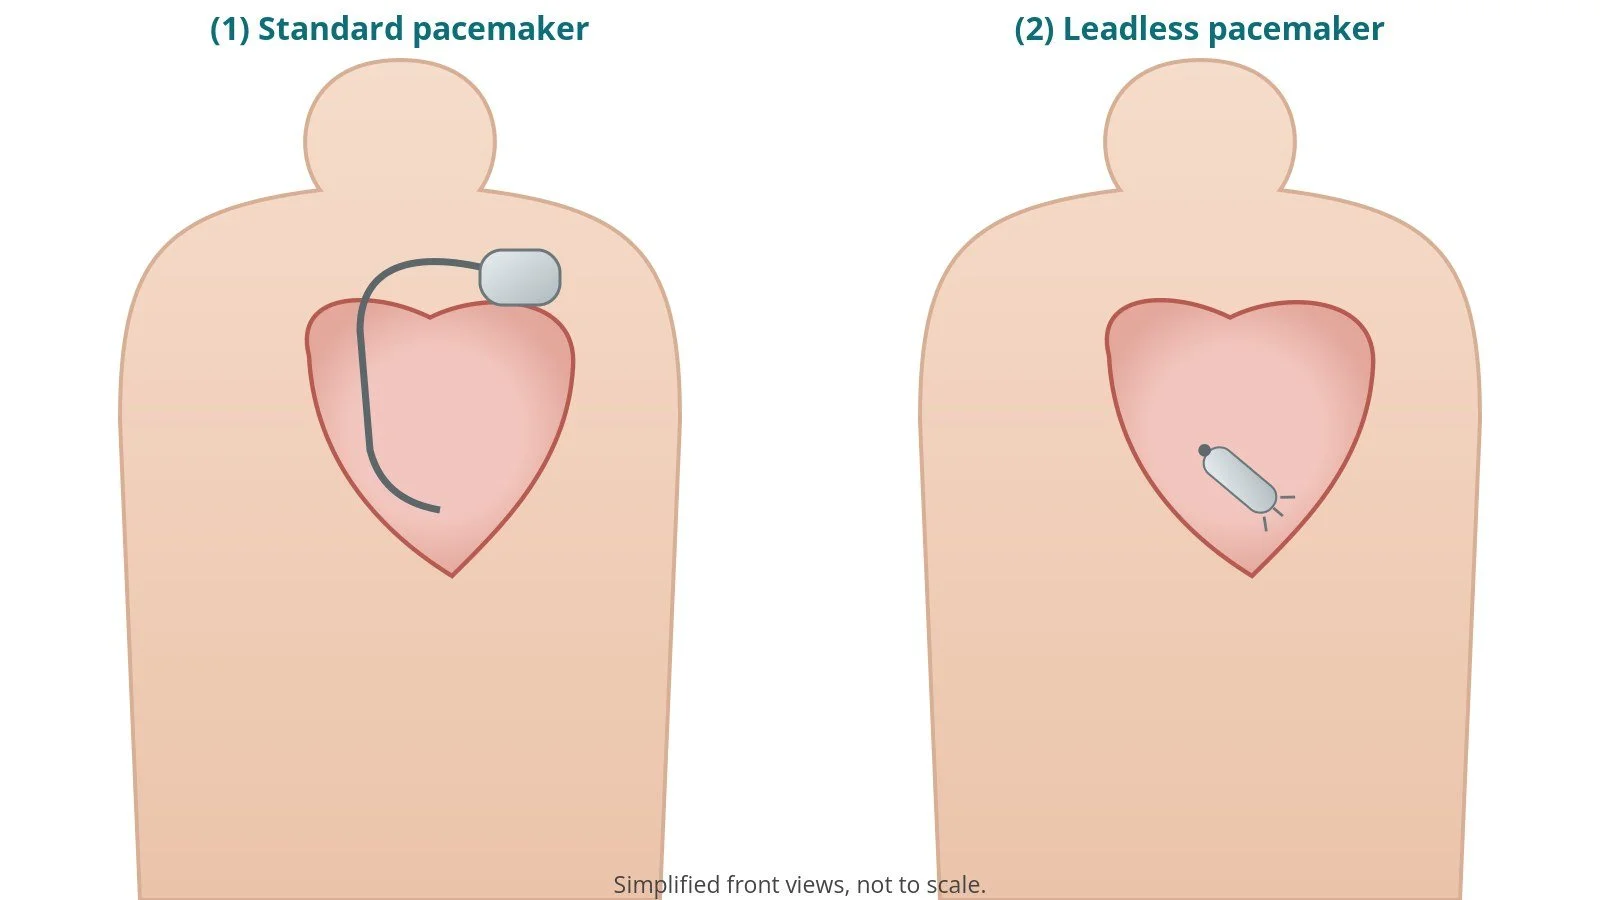
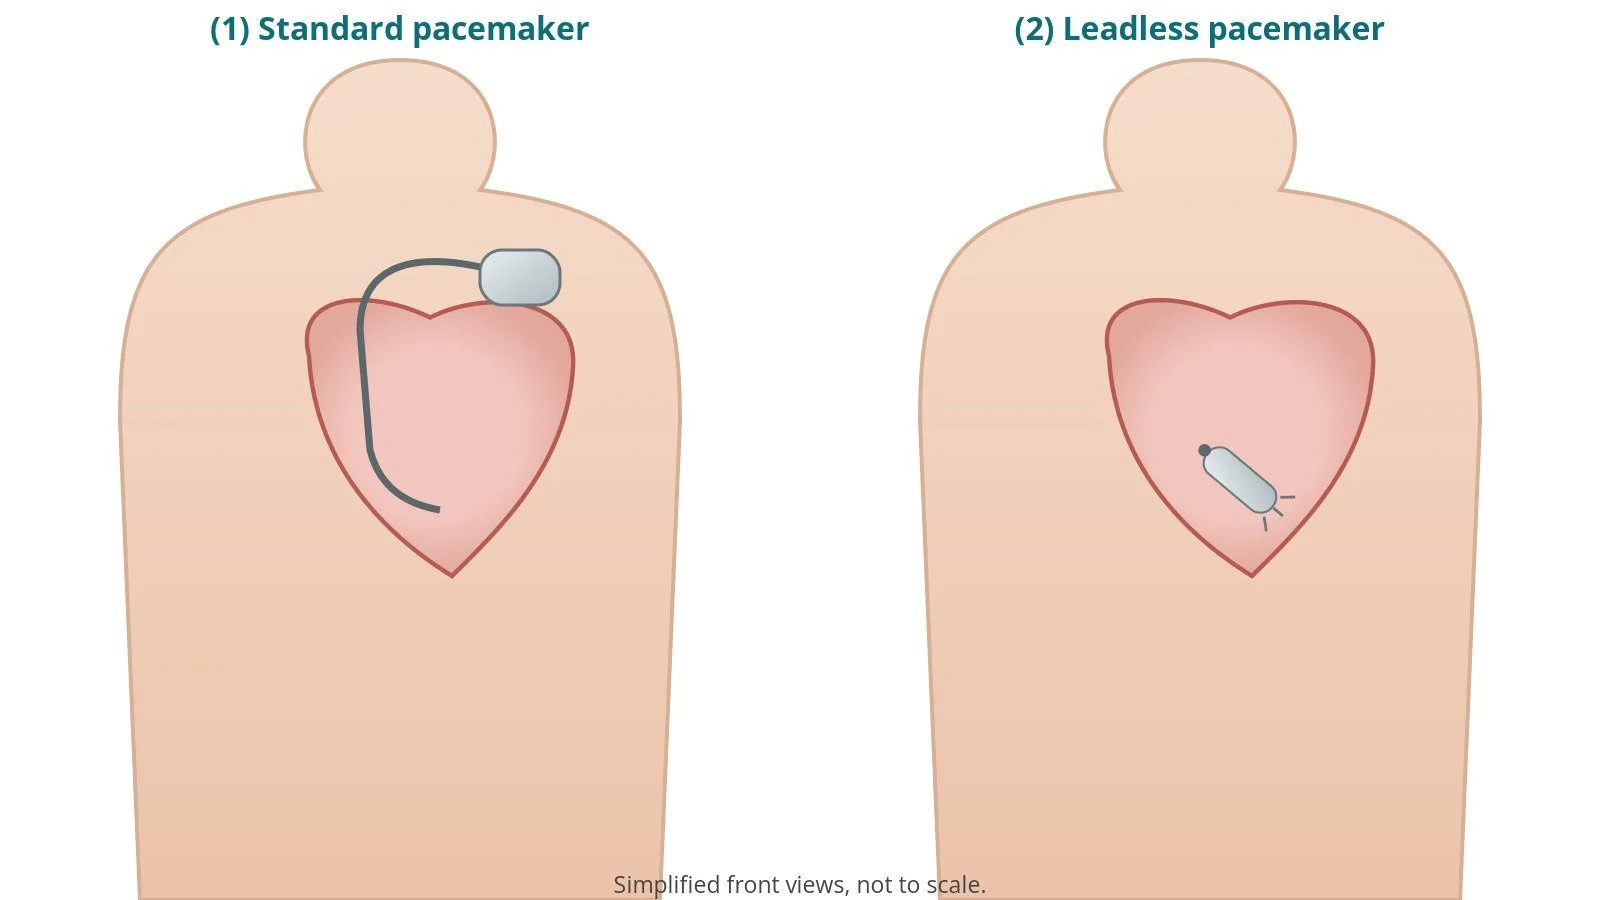
(1) Standard pacemaker: box and lead. (2) Leadless pacemaker: a small capsule inside the right ventricle.
What is leadless pacemaker retrieval?
A standard pacemaker has a box under the skin of the chest and one or more leads through a vein into the heart. A leadless pacemaker puts everything (battery, electronics and electrode) into one small capsule that is fixed to the inside wall of the right ventricle (RV), usually with small tines or a helix. It is implanted through a large sheath in the femoral vein. Because there is no pocket or lead, some complications of standard pacemakers are avoided. See the pacemaker, ICD and CRT guide.
Sometimes the capsule needs removing. Many designs have a docking button at the end so that a snare (a wire loop) or a dedicated retrieval tool can catch it. The capsule is then drawn into a protective retrieval sheath or cup and removed through the groin.
Retrieval is easier soon after implant. Over time, tissue can grow over the capsule, which can make removal harder; in that case, the team may leave it switched off and implant a new device instead.
New to the acronyms? See the Cath Lab Abbreviations A–Z.
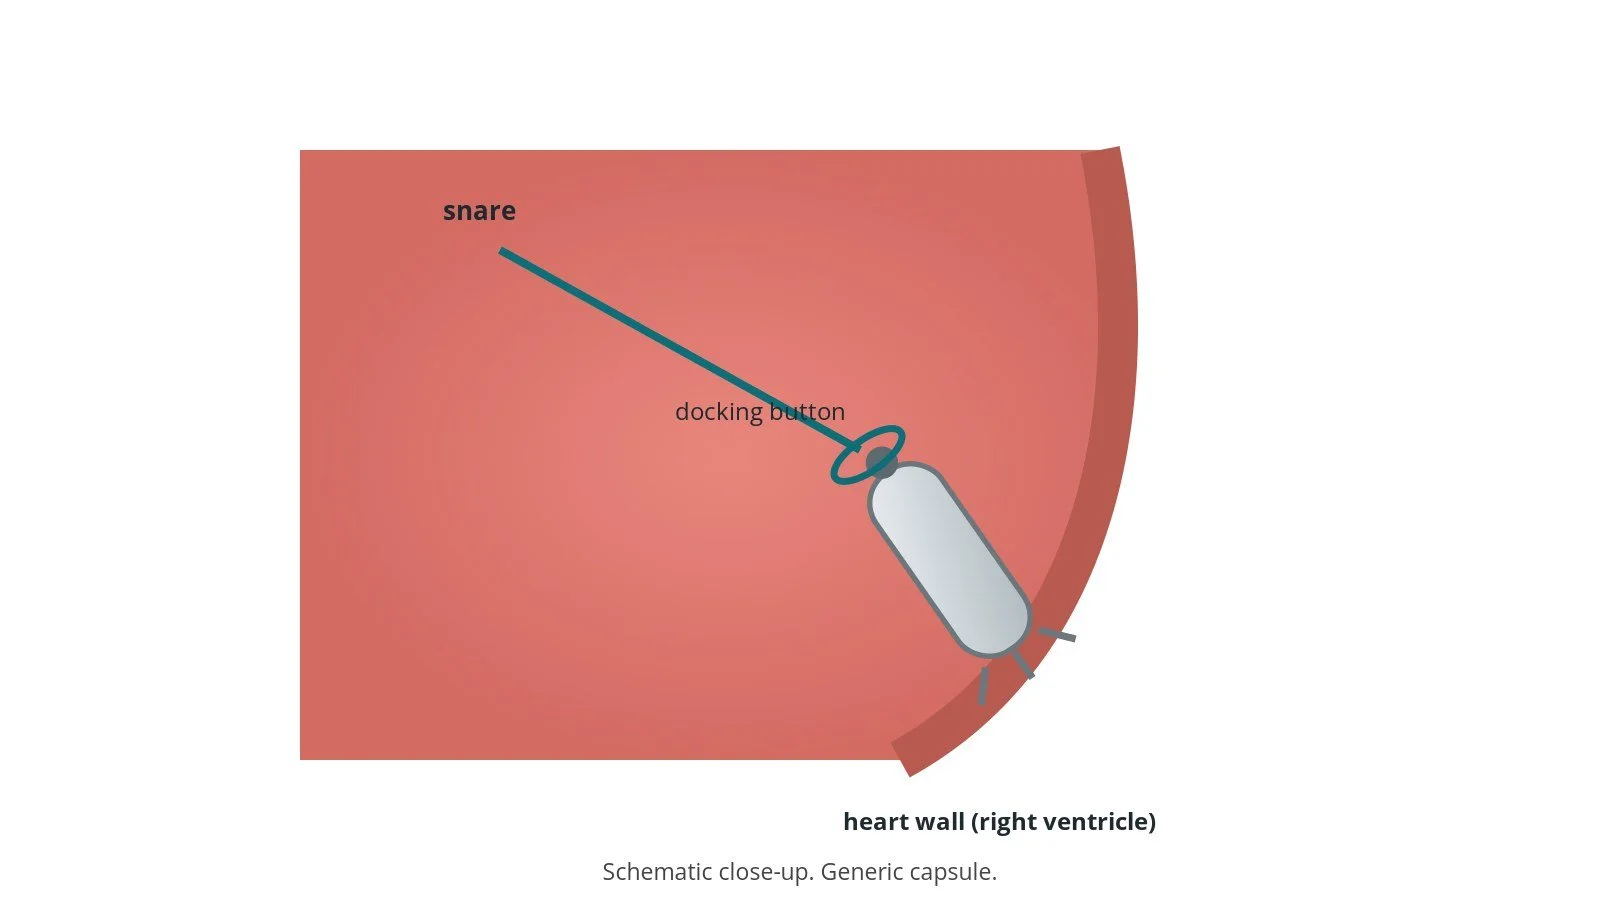
A snare loop (teal) catches the docking button at the end of the capsule.
Who is it for?
Reasons for retrieval include:
the capsule has moved (dislodged) or is in a poor position
it is not pacing properly (high thresholds)
the battery is running low and removal is chosen over leaving it in place
the person needs a different device, such as one with more leads or a defibrillator
rarely, infection
NICE guidance (TA314) and the ESC pacing guidelines cover choice of pacemakers; decisions about retrieval are made by a heart rhythm specialist and depend on the device and the time since implant.
When is it done?
It can be planned or urgent (for example after dislodgement). Before it, the team usually:
reviews the device type and implant date, and gets the right retrieval kit
arranges a device check, echo and blood tests
plans temporary pacing if the person depends on the pacemaker
reviews blood thinners, as per centre protocol
Step by step
1. Anaesthetic and access
Done under local anaesthetic with mild sedation, or general anaesthetic. The skin over the femoral vein is numbed (dose as per centre protocol). A sheath is placed in the femoral vein under ultrasound and dilated in steps up to the large retrieval sheath; sizes per device and operator. A stiff wire is used to guide the dilators and sheath. Heparin may be given, as per centre protocol.
2. Reaching the capsule
The large sheath is passed up the IVC into the right atrium. A steerable catheter carrying the snare is passed through it, across the tricuspid valve, to the capsule in the RV.
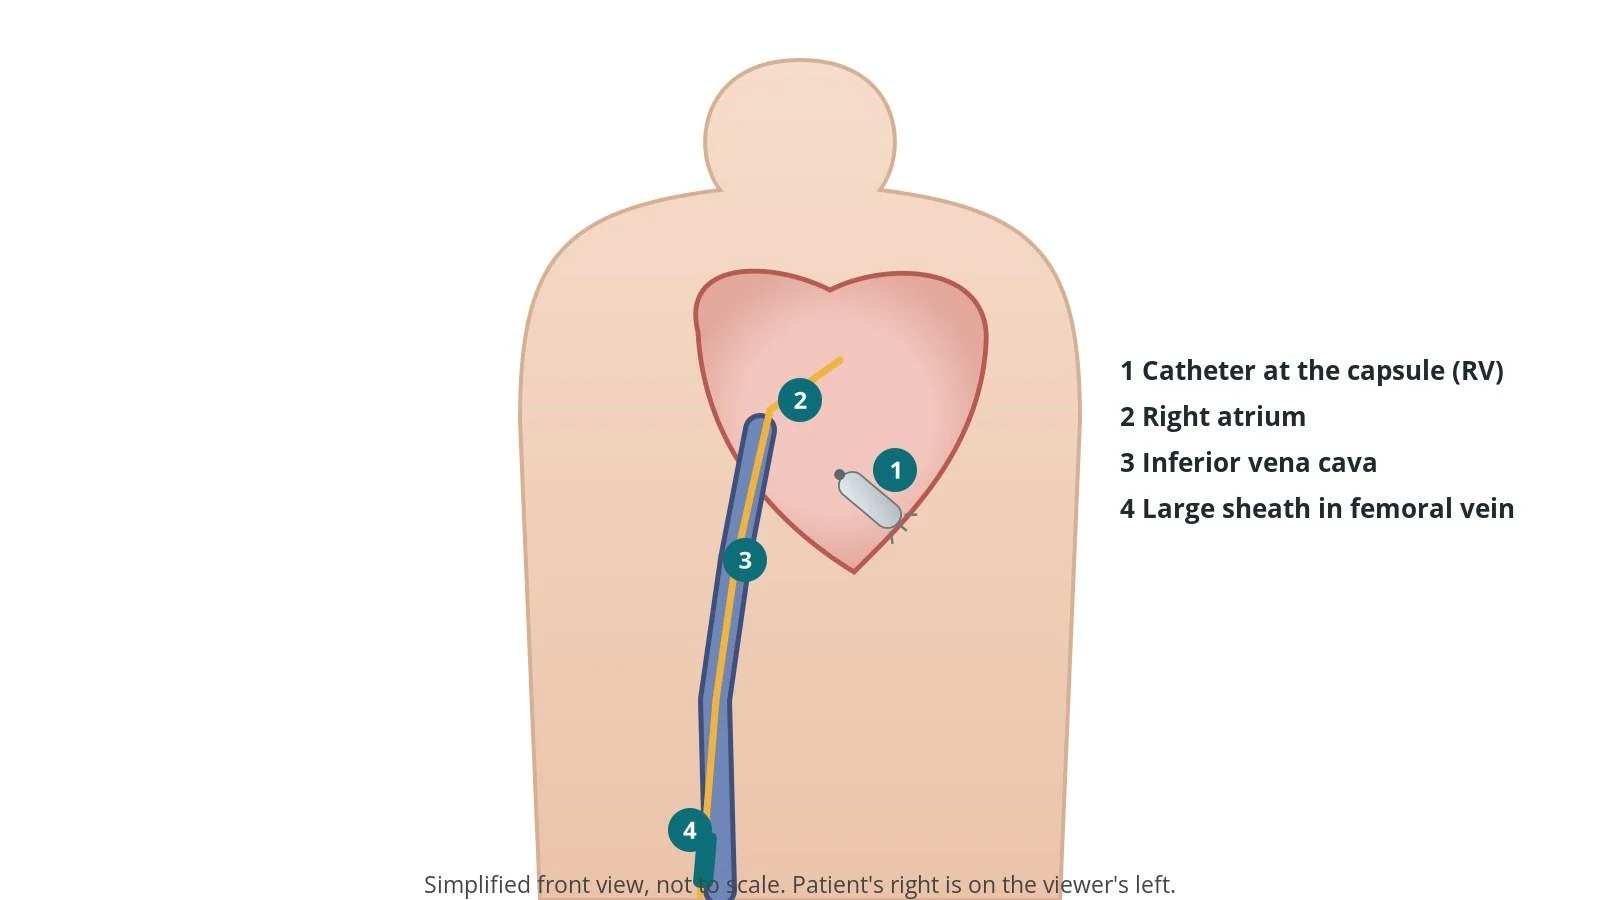
Access: (1) catheter at the capsule in the right ventricle; (2) right atrium; (3) inferior vena cava; (4) large sheath in the right femoral vein.
3. Retrieval
A. Approach. The steerable catheter is aimed at the docking button of the capsule.
B. Snare. The snare loop is opened, placed over the docking button and tightened.
C. Release from the wall. The capsule is gently freed from the heart wall, per device instructions (for example by pulling the catheter into a protective cup or by unscrewing a helix).
D. Remove. The capsule is drawn into the sheath and the whole system is removed together.
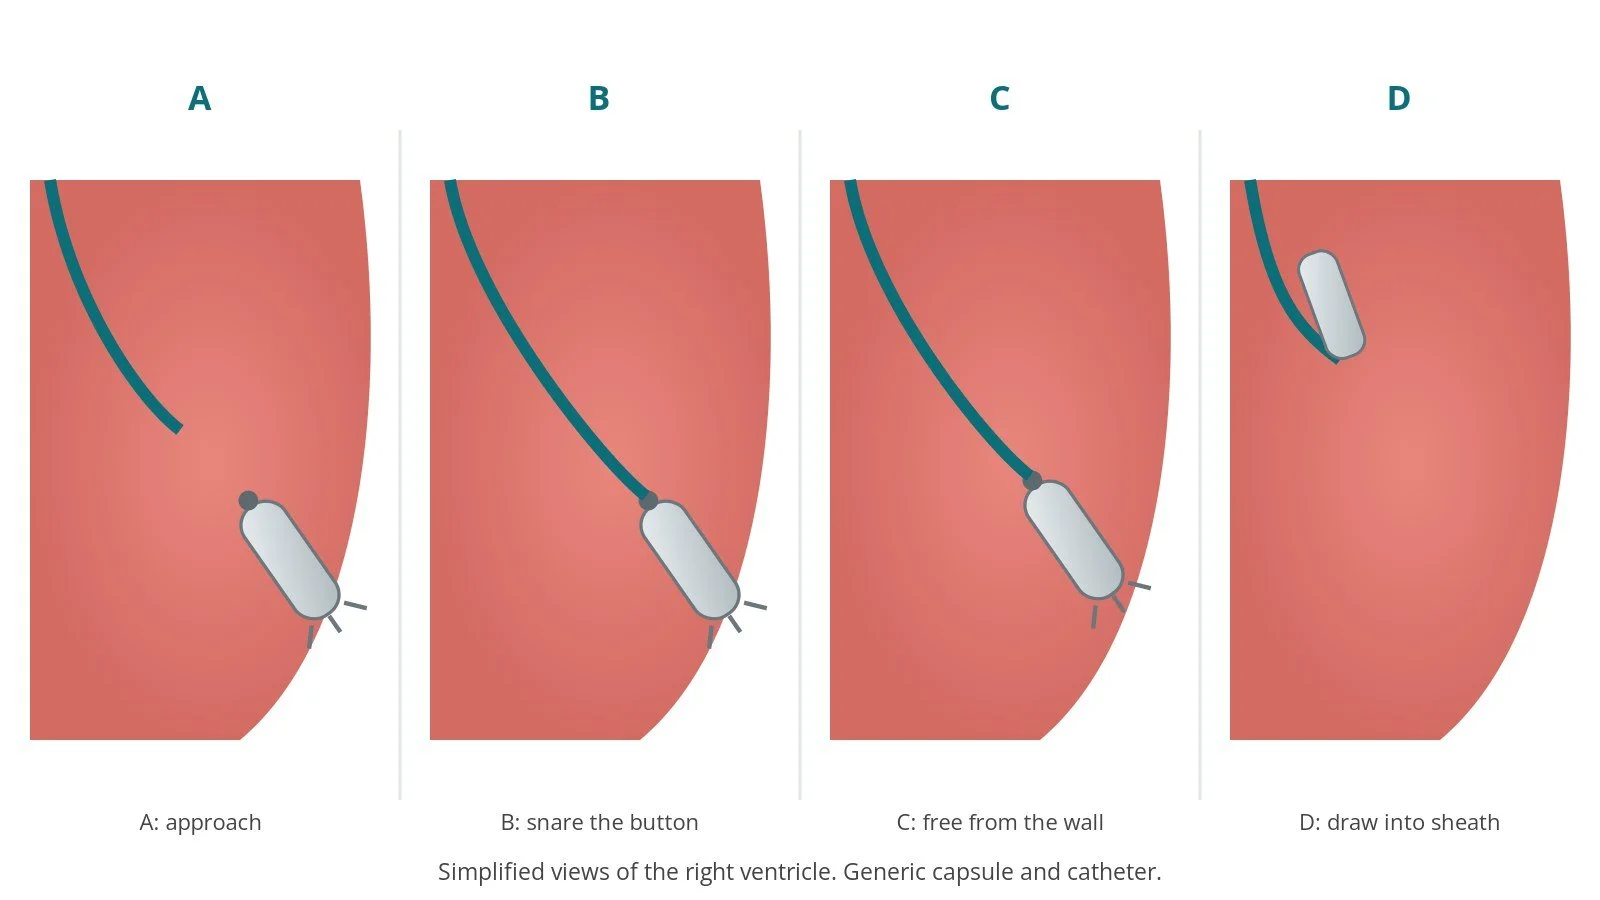
A: approach. B: snare the button. C: free from the wall. D: draw into the sheath and remove.
4. Finishing
The pacemaker system is checked or a new device implanted if planned. The large sheath is removed and the groin closed, often with a figure-of-eight (Z) stitch and a dressing, per operator. An echo may check for fluid around the heart.
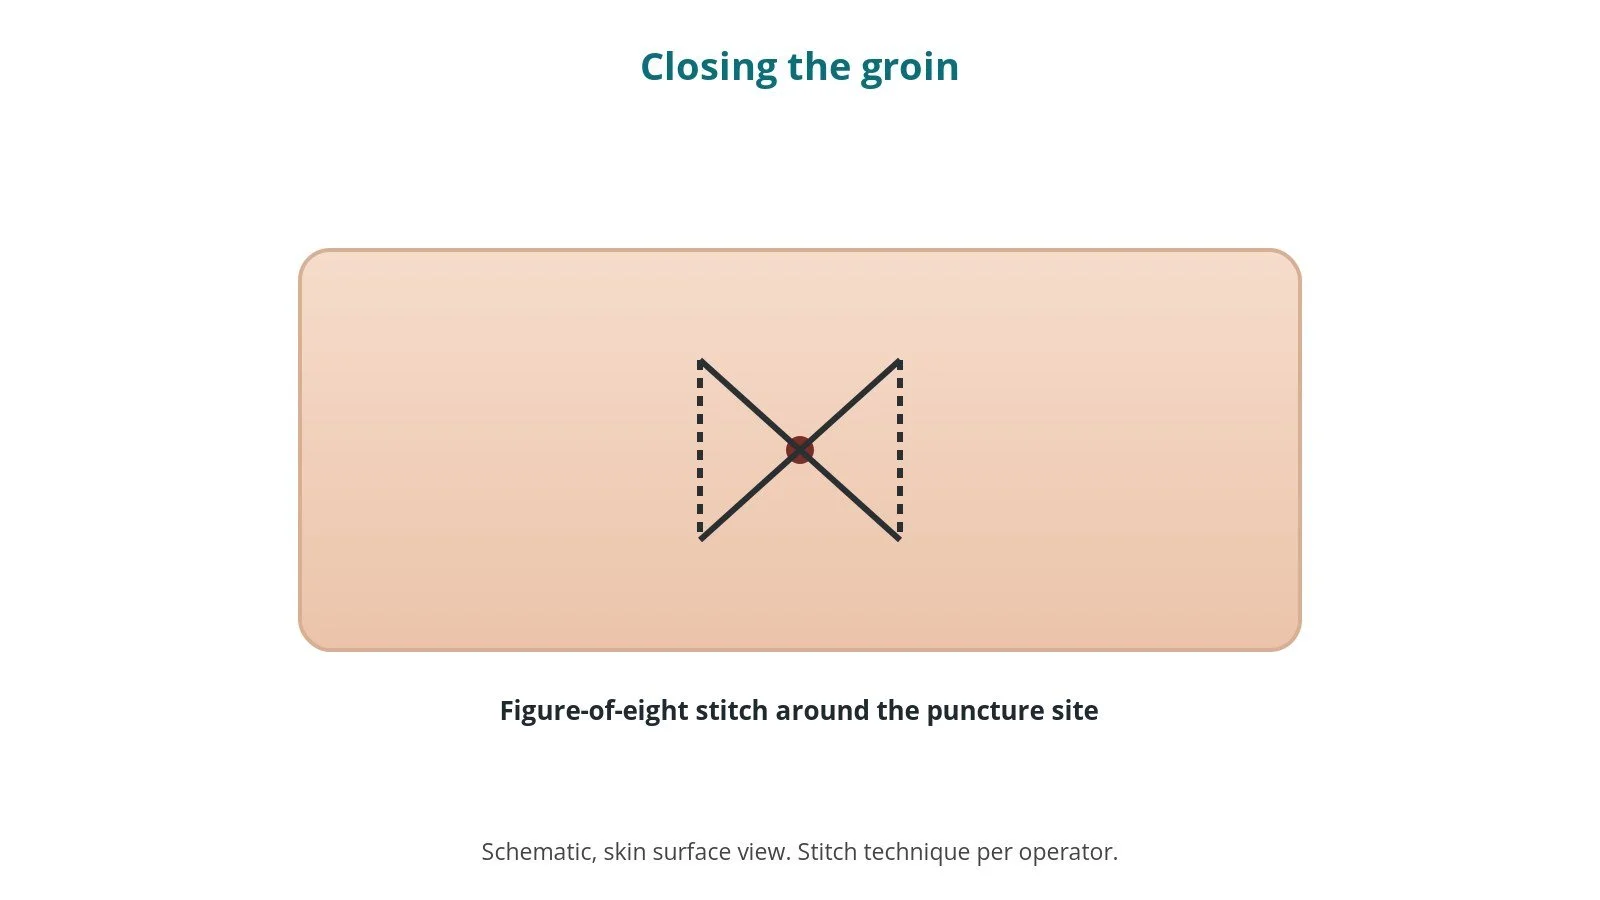
A figure-of-eight (Z) stitch closes the groin after the large sheath is removed.
Recovery and aftercare
First hours: bed rest with checks of the groin, heart rhythm and blood pressure, as per centre protocol.
Going home: often the same or next day.
Stitch: the groin stitch is usually removed after a day or as advised.
Activity: avoid heavy lifting and strenuous exercise for about a week, or as advised.
Device: follow-up in the device clinic, especially if a new device was fitted.
Driving: DVLA guidance after a pacemaker implant or box change for a car licence is not to drive for at least one week; rules after removal depend on why it was removed and whether a new device was fitted. Ask your team.
Call 999 if you have chest pain, sudden breathlessness, fainting, a very slow pulse, or heavy groin bleeding.
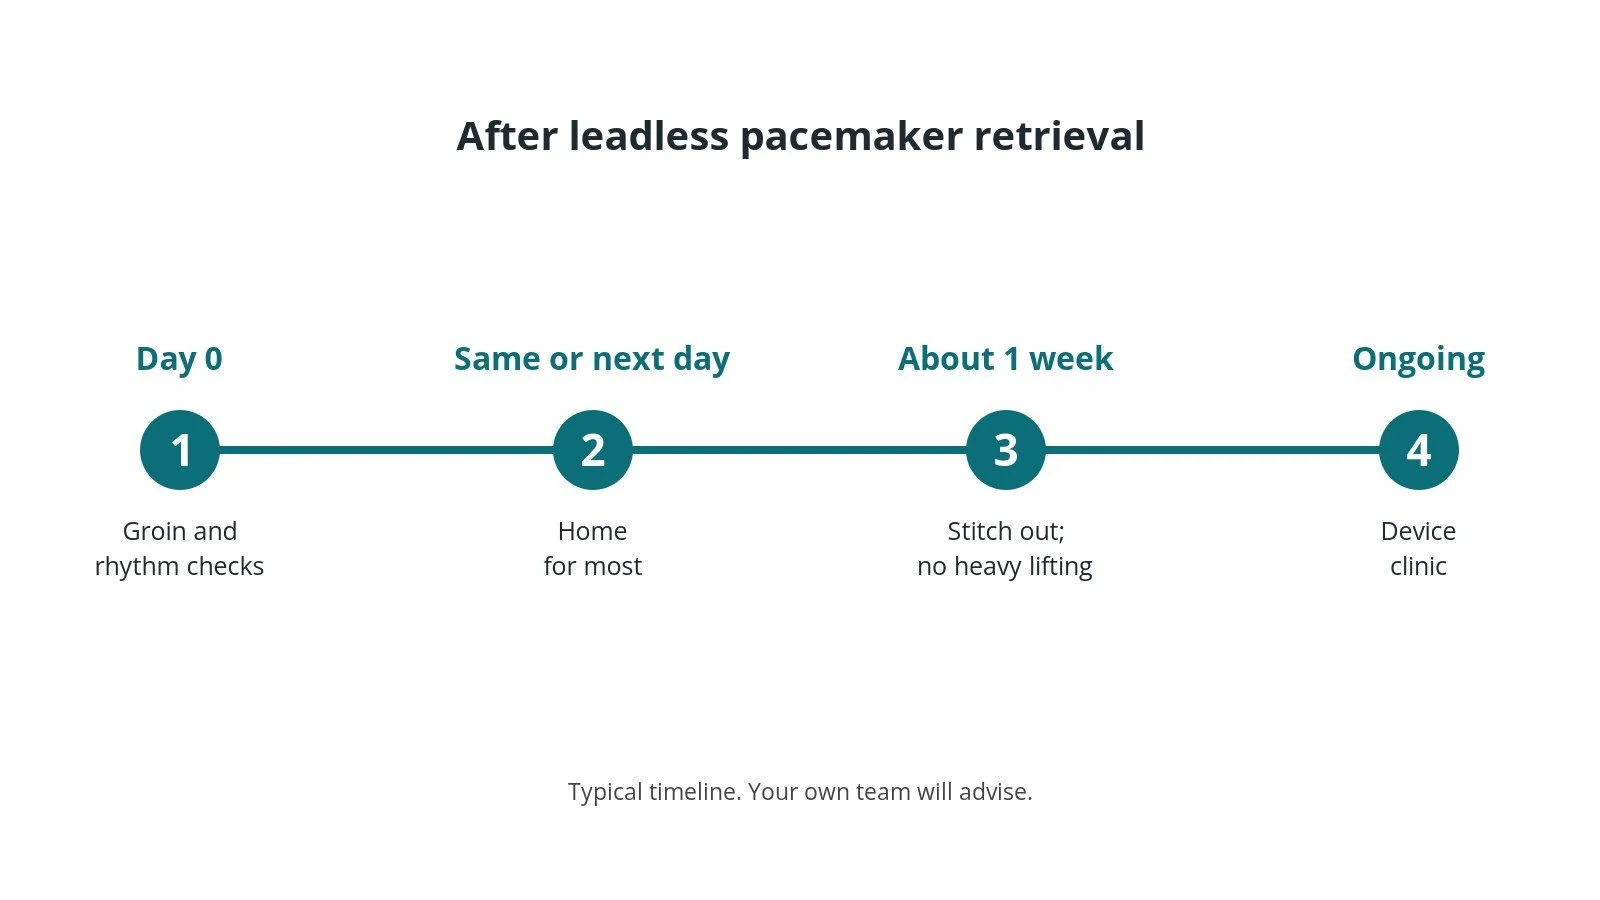
After retrieval: (1) checks; (2) home for most; (3) stitch out, no heavy lifting for a week; (4) device clinic.
Risks and complications
Your team will discuss your own risks. Possible problems include:
injury to the heart wall causing fluid around the heart (tamponade)
damage to the tricuspid valve
heart rhythm problems, or slow heart rate if pacing is interrupted
the capsule being released and moving before it is secured
bleeding or a vein injury at the groin
inability to remove the capsule, so it is left in place
Cath lab kit list (printable)
Barts example kit list
An example from one UK centre, written generically. Every lab has its own protocol, and sizes and doses vary.
EP procedure pack; local anaesthetic, as per centre protocol; skin antiseptic applicator
ultrasound and sterile probe cover
femoral venous sheaths and dilators, stepping up in size, per device and operator
extra-stiff J-tip wire, per operator
large retrieval/introducer sheath, per device and operator
steerable catheter, size and length per device and operator
snare (multi-loop or single-loop, size per operator) or the dedicated retrieval tool for that device
non-absorbable suture for a figure-of-eight stitch; transparent dressing
temporary pacing kit and defibrillator ready
Procedural steps (Barts example)
Local anaesthetic and sedation; femoral venous access under ultrasound
Dilate in steps; stiff wire; large retrieval sheath
Steerable catheter and snare to the capsule under X-ray
Snare the docking button; free the capsule per device instructions
Draw it into the sheath and remove the system as one
Figure-of-eight stitch; dressing
First time in the cath lab?
💡 First-time tip
Know the device. Different leadless pacemakers need different retrieval tools. Check the implant record first. Pacing back-up. If the patient depends on the pacemaker, temporary pacing must be ready. Big sheath, big bleed. Have the stitch and pressure ready for when the sheath comes out. Keep the capsule. Some teams send the removed device for analysis; check before it goes in the bin. Watch the pressure. A falling blood pressure can mean tamponade.
FAQ
Is it always possible to remove a leadless pacemaker?
Not always, especially years after implant. Sometimes it is left in place, switched off, and a new device is fitted.
Will I need a new pacemaker?
Often yes, either another leadless device or a standard pacemaker, depending on why it was removed.
Is it painful?
The groin is numbed. You may feel pressure and some soreness afterwards.
How long will I stay in hospital?
Often the same or next day.
Related Cath Lab 101 guides
Sources
All checked on 10 October 2026. Each page's own date is shown where it gives one.
NICE. Implantable cardioverter defibrillators and cardiac resynchronisation therapy (TA314) and dual-chamber pacemakers guidance. nice.org.uk/guidance/ta314
British Heart Foundation. Pacemakers. bhf.org.uk
DVLA / GOV.UK. Cardiovascular disorders: assessing fitness to drive (pacemaker implant). gov.uk
Disclaimer
Education only. This page is for general education for healthcare students, cath lab staff and curious readers. It isn't medical advice and doesn't replace advice from your own doctor, heart team or local unit protocols. Equipment and medicines are described generically. No product or manufacturer is recommended. If you think someone is having a heart emergency, call 999.
Disclosure: I work for a company that makes a device used in this procedure. This page is independent education, isn't sponsored or reviewed by any company, and doesn't recommend any product.
All diagrams on this page are original illustrations created for rodnieoro.com.