Paravalvular leak (PVL) closure: a Cath Lab 101 guide
Reviewed by Rodnie Oro, cath lab charge nurse · Last reviewed: October 2026 · Education only, not medical advice
PVL closure in one minute
What it is: after a heart valve is replaced, a gap can form between the new valve's ring and the heart tissue, so blood leaks around the outside of the valve (paravalvular leak, PVL). PVL closure plugs the gap with one or more small occluder devices delivered by catheter, avoiding repeat open-heart surgery for many people.
Who it is for: people with a significant leak causing heart failure symptoms or haemolysis (red blood cells being broken up, causing anaemia), as decided by a heart team.
Main risks: the plug interfering with the valve leaflets, the plug moving, the leak not fully closing, bleeding, stroke and fluid around the heart. Your team will explain your own risk.
Usually: under general anaesthetic with transoesophageal echo (TOE), about 2 to 4 hours, often home after 1 to 3 nights.
On this page: What is paravalvular leak closure? · Who is it for? · When is it done? · Step by step · Recovery · Risks · Kit list · First time in the lab? · FAQ
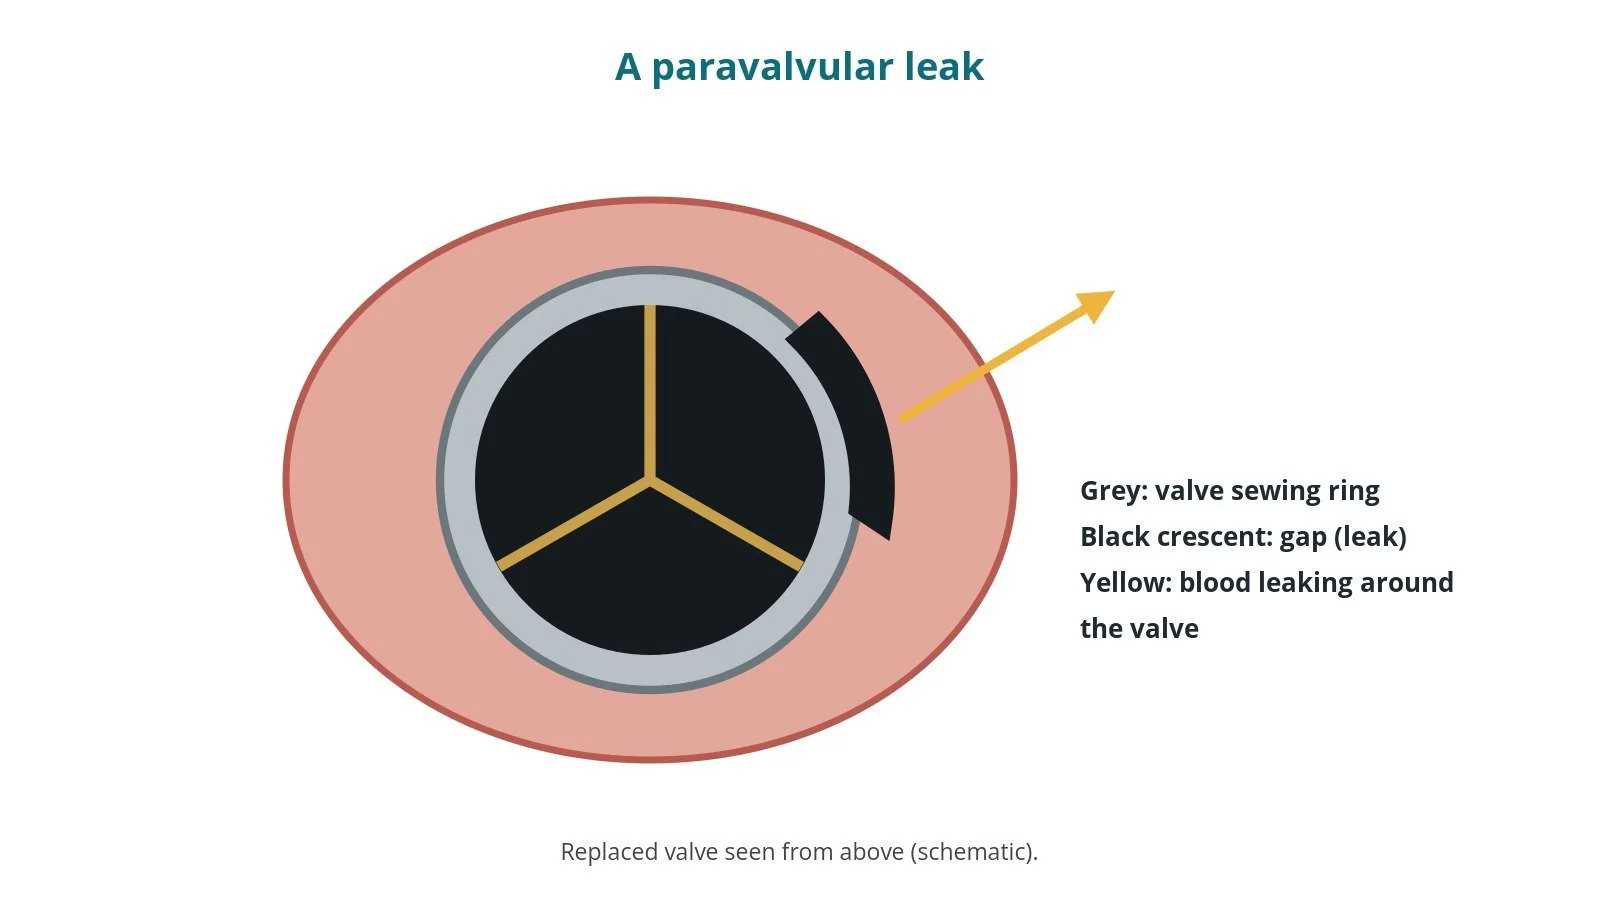
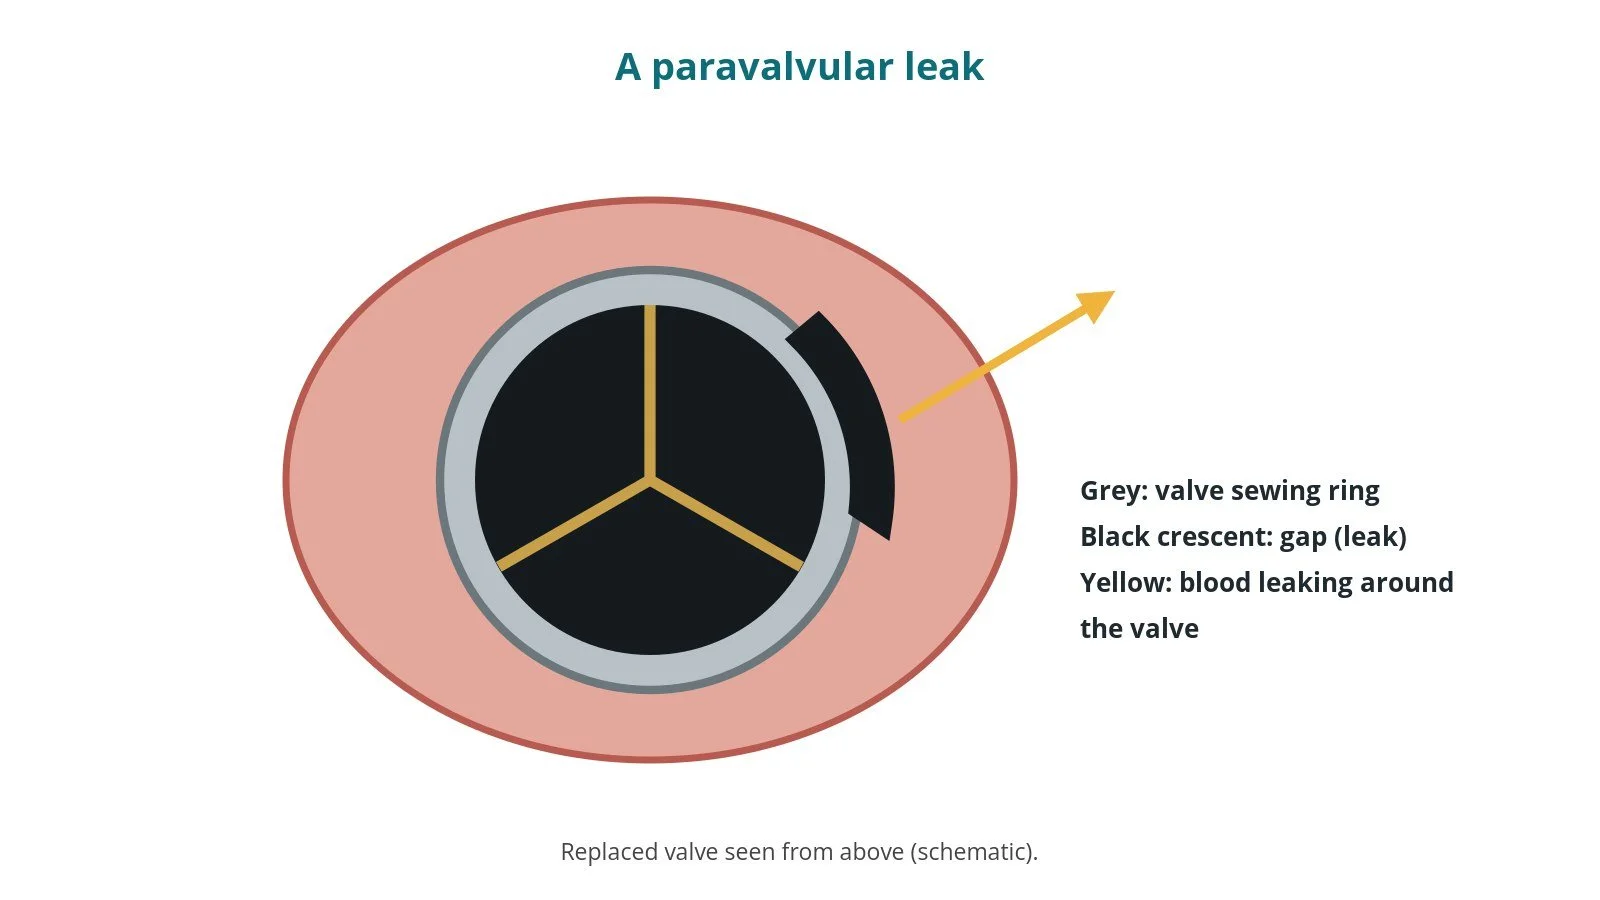
A paravalvular leak: blood leaks through a gap between the valve ring and the heart tissue, around the outside of the valve.
What is paravalvular leak closure?
A replaced heart valve, surgical or transcatheter (TAVI), is held in place by its sewing ring or frame. If the tissue around it is calcified, fragile or infected, or the stitches loosen, a gap can open between the ring and the heart. Blood then leaks around the valve rather than through it. This is a paravalvular leak (PVL).
Small leaks are common and often cause no problems. Larger leaks can cause:
heart failure, with breathlessness, tiredness and swelling
haemolysis, where blood forced through the narrow gap breaks red blood cells, causing anaemia and sometimes the need for transfusions
PVL closure places one or more occluder plugs (small, self-expanding mesh devices) into the gap. The approach depends on the valve:
mitral PVL: usually from the femoral vein and across the atrial septum (transseptal), or sometimes through the apex of the heart
aortic PVL: usually from the femoral artery, approaching the leak from the aorta
New to the acronyms? See the Cath Lab Abbreviations A–Z.
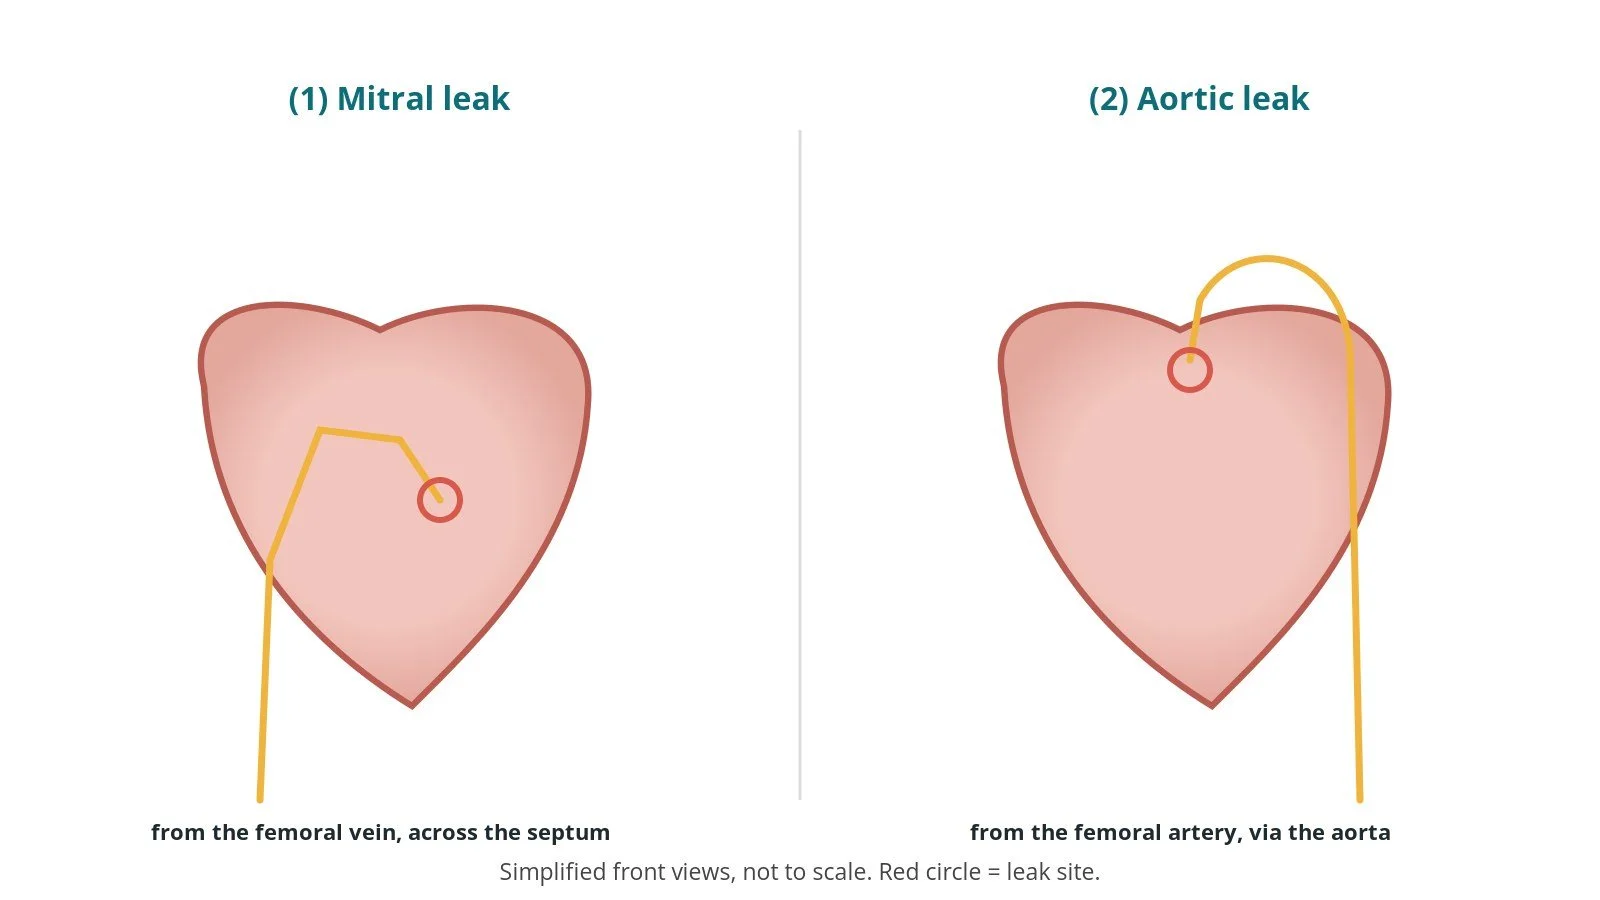
Routes: (1) mitral leak, from the femoral vein across the septum; (2) aortic leak, from the femoral artery via the aorta.
Who is it for?
NICE (HTG585, 2021) covers percutaneous closure of a paravalvular leak around a replaced mitral or aortic valve. The ESC/EACTS valvular heart disease guidelines say transcatheter closure should be considered for suitable leaks with clinically significant regurgitation or haemolysis in people at high surgical risk, decided by a heart team.
Before closure, the team checks that the valve itself works well and that there is no active infection (endocarditis).
When is it done?
It is usually planned. Before it, the team usually arranges:
TOE, often with 3D imaging, to find the exact position, shape and size of the leak
CT in some cases
blood tests, including markers of haemolysis and a group and save
a review of blood thinners, as per centre protocol
Step by step
1. Anaesthetic and set-up
PVL closure is done under general anaesthetic with TOE guidance. Sheaths are placed in the femoral vein and/or artery under ultrasound. Sizes are per device and operator. Heparin is given, dose as per centre protocol.
2. Reaching the leak
Mitral: a transseptal puncture is made and a steerable sheath is aimed at the leak, using 3D TOE to guide it.
Aortic: a catheter in the aortic root is aimed at the leak.
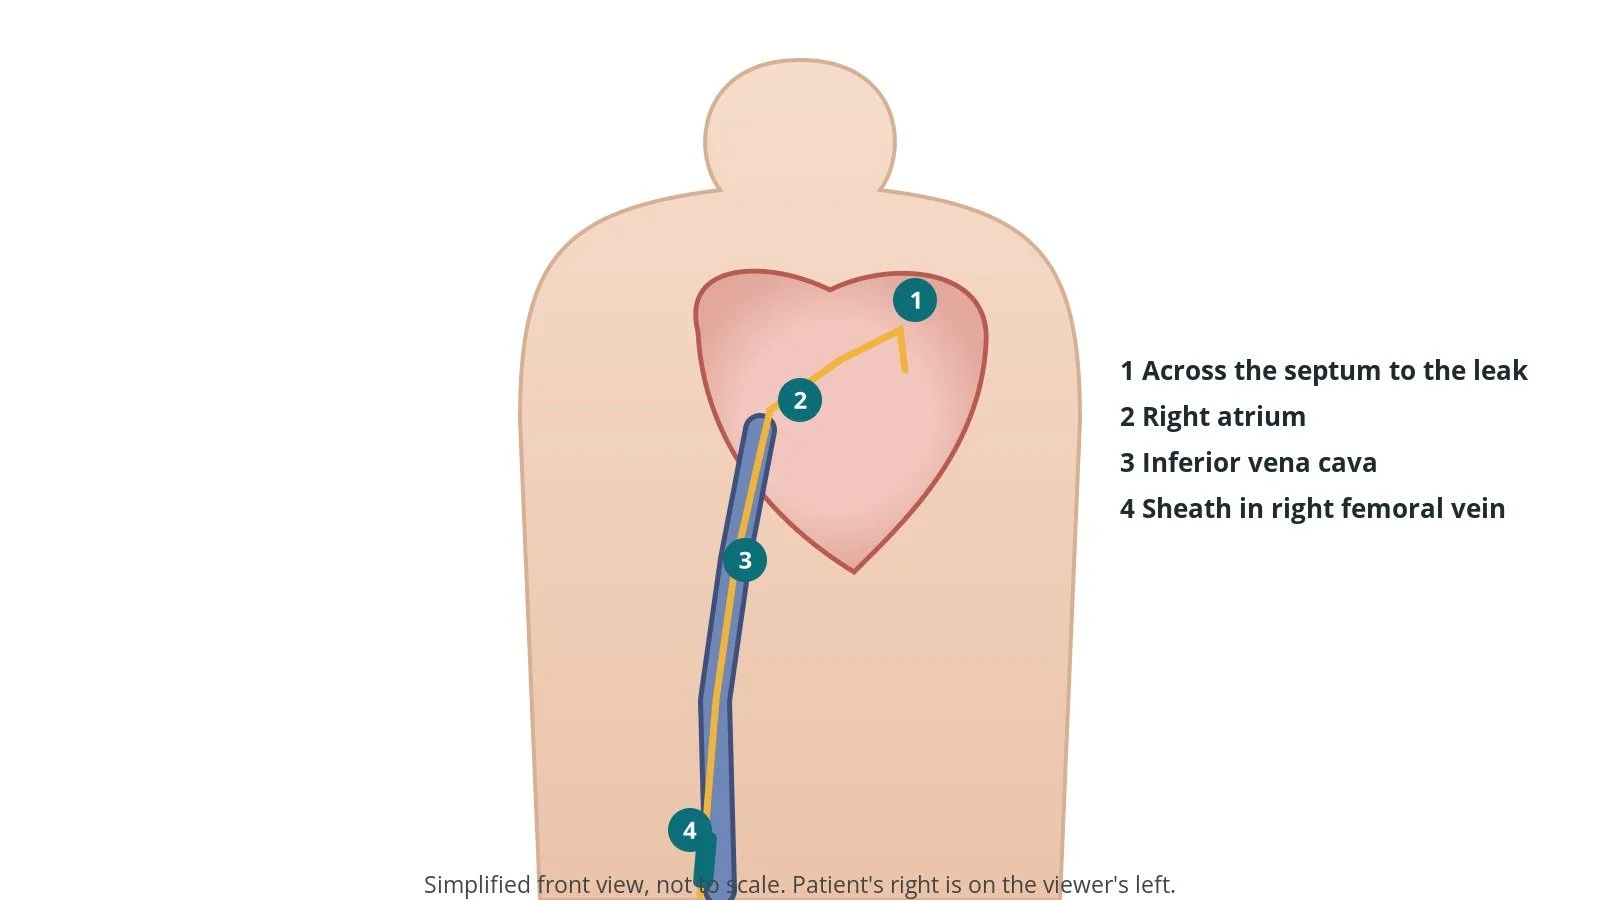
Mitral approach: (1) across the septum to the leak; (2) right atrium; (3) inferior vena cava; (4) sheath in the right femoral vein.
3. Closing the leak
A. Cross. A soft, steerable wire is passed through the gap, guided by TOE and X-ray.
B. Support. A catheter is advanced over the wire; for difficult leaks, the wire may be snared and brought out through another sheath to form a rail for extra support, per operator.
C. Deploy. A delivery sheath is advanced through the gap and the occluder is opened so it fills the gap. Sometimes two or more plugs are needed side by side.
D. Check. Before release, TOE checks the leak, that the plug does not touch the valve leaflets and that the valve still opens and closes normally. The plug is then released.
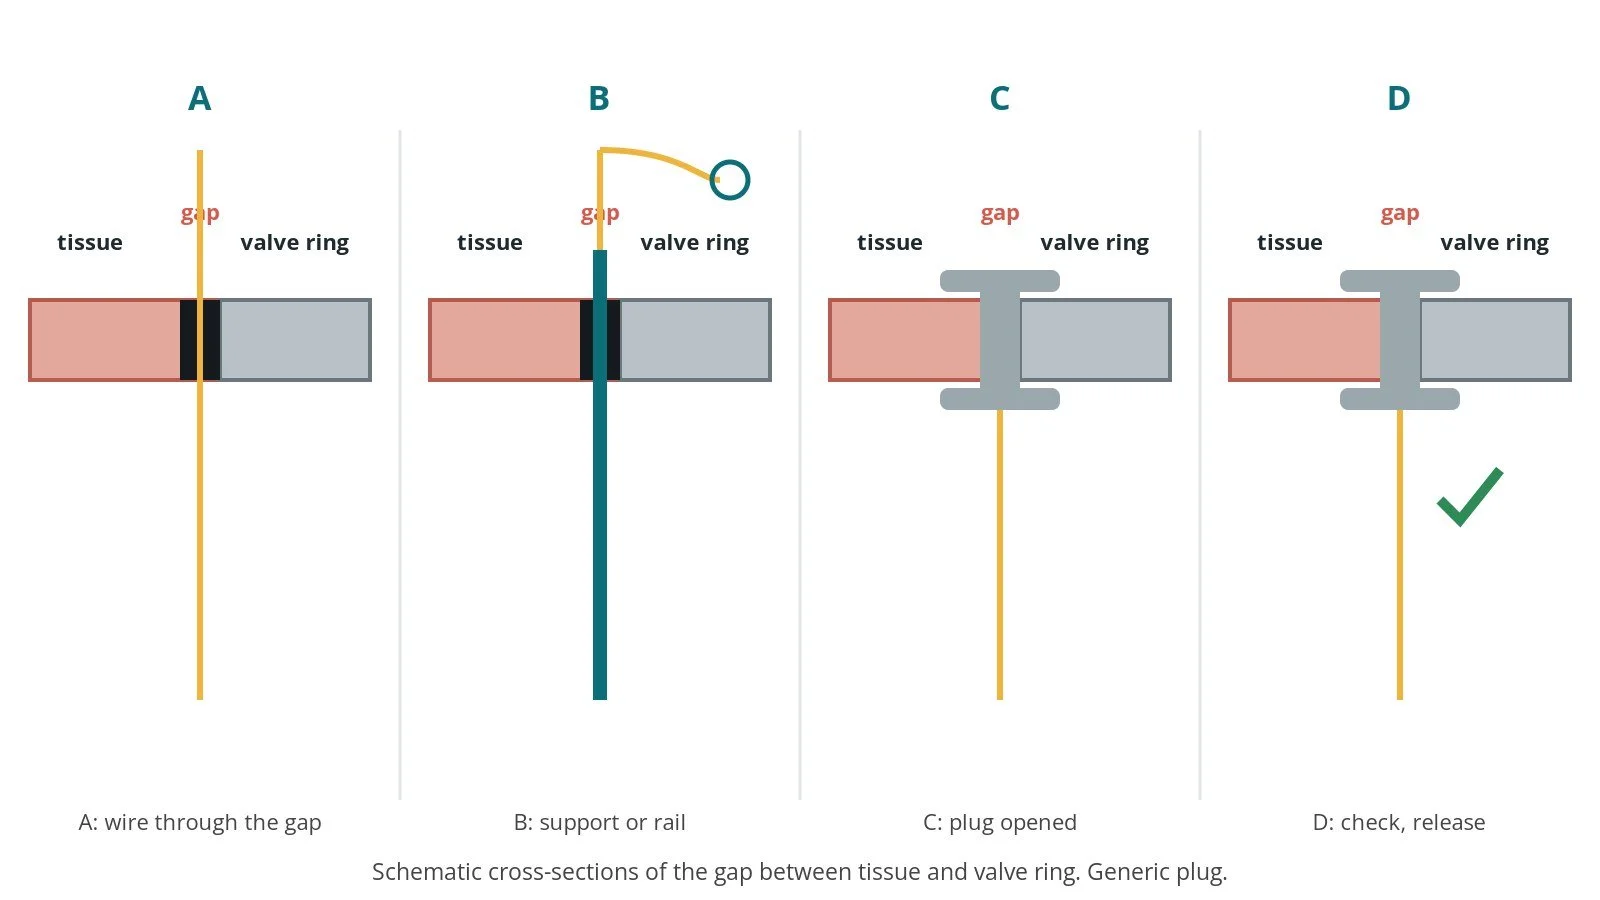
A: wire through the gap. B: catheter support or rail. C: plug opened in the gap. D: check and release.
4. Finishing
Catheters and sheaths are removed. The septum is checked on echo for a significant shunt after a mitral procedure. The groins are closed with pressure or a closure device, per operator.
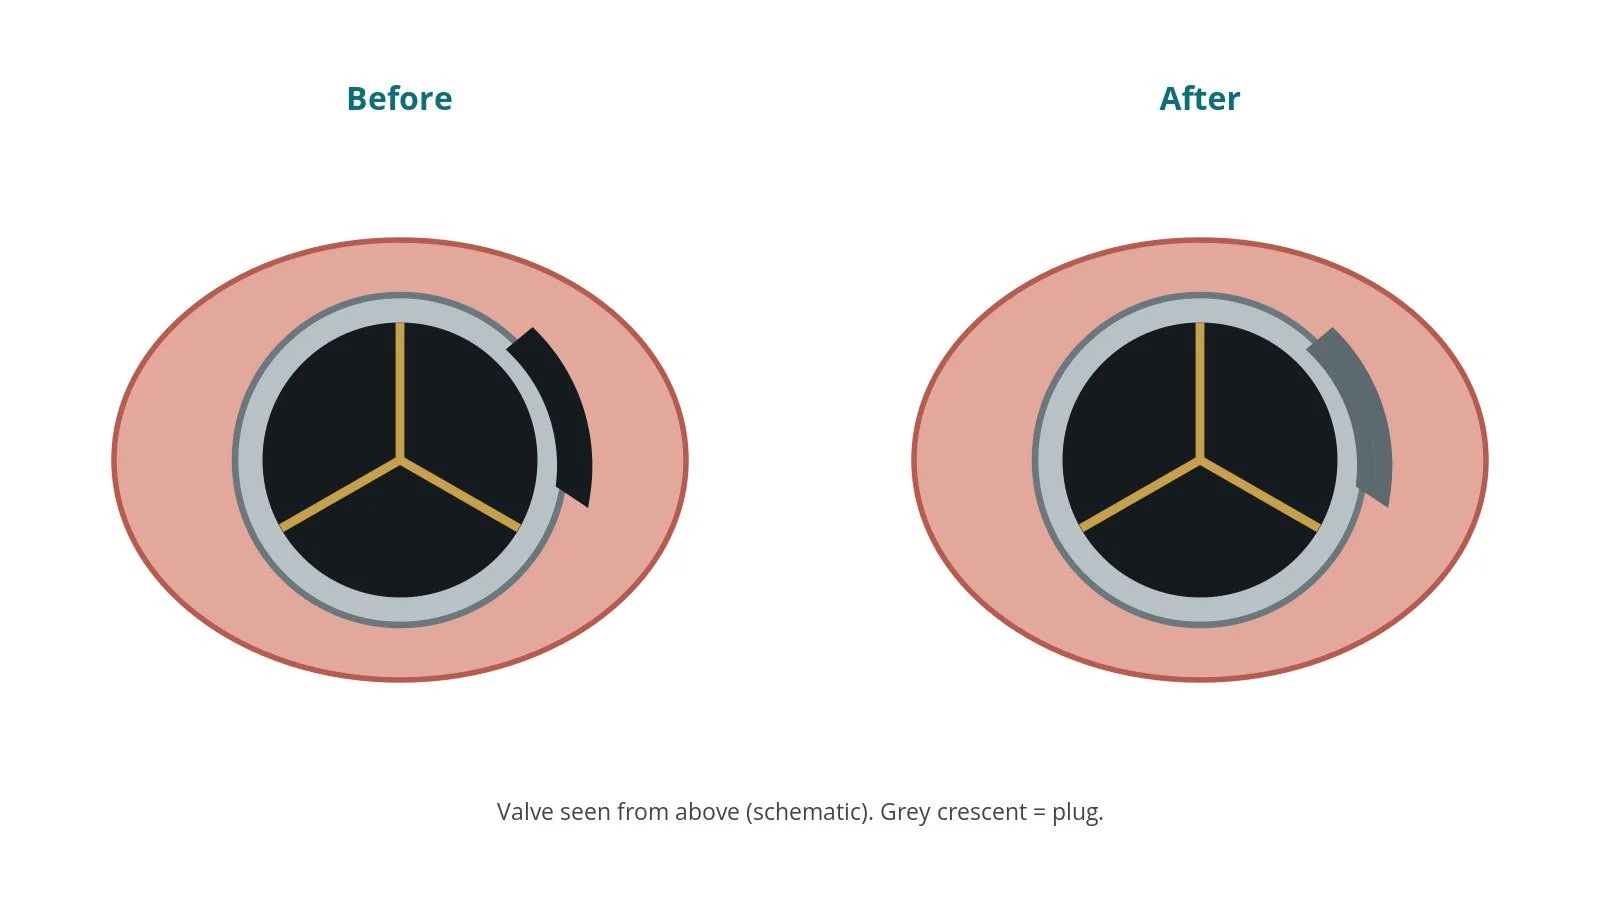
Before: a crescent-shaped gap beside the valve ring. After: a plug fills the gap.
Recovery and aftercare
First hours: bed rest with checks of the groins, heart rhythm and blood pressure, as per centre protocol.
Echo: before discharge to check the plug and the valve.
Going home: often after 1 to 3 nights.
Blood tests: if haemolysis was the problem, blood counts are followed up.
Activity: avoid heavy lifting for about a week, or as advised.
Driving: follow DVLA guidance for percutaneous valve intervention; for a car licence this is usually no driving for 2 weeks. Ask your team.
Call 999 if you have chest pain, sudden breathlessness, fainting, signs of a stroke, or heavy groin bleeding.
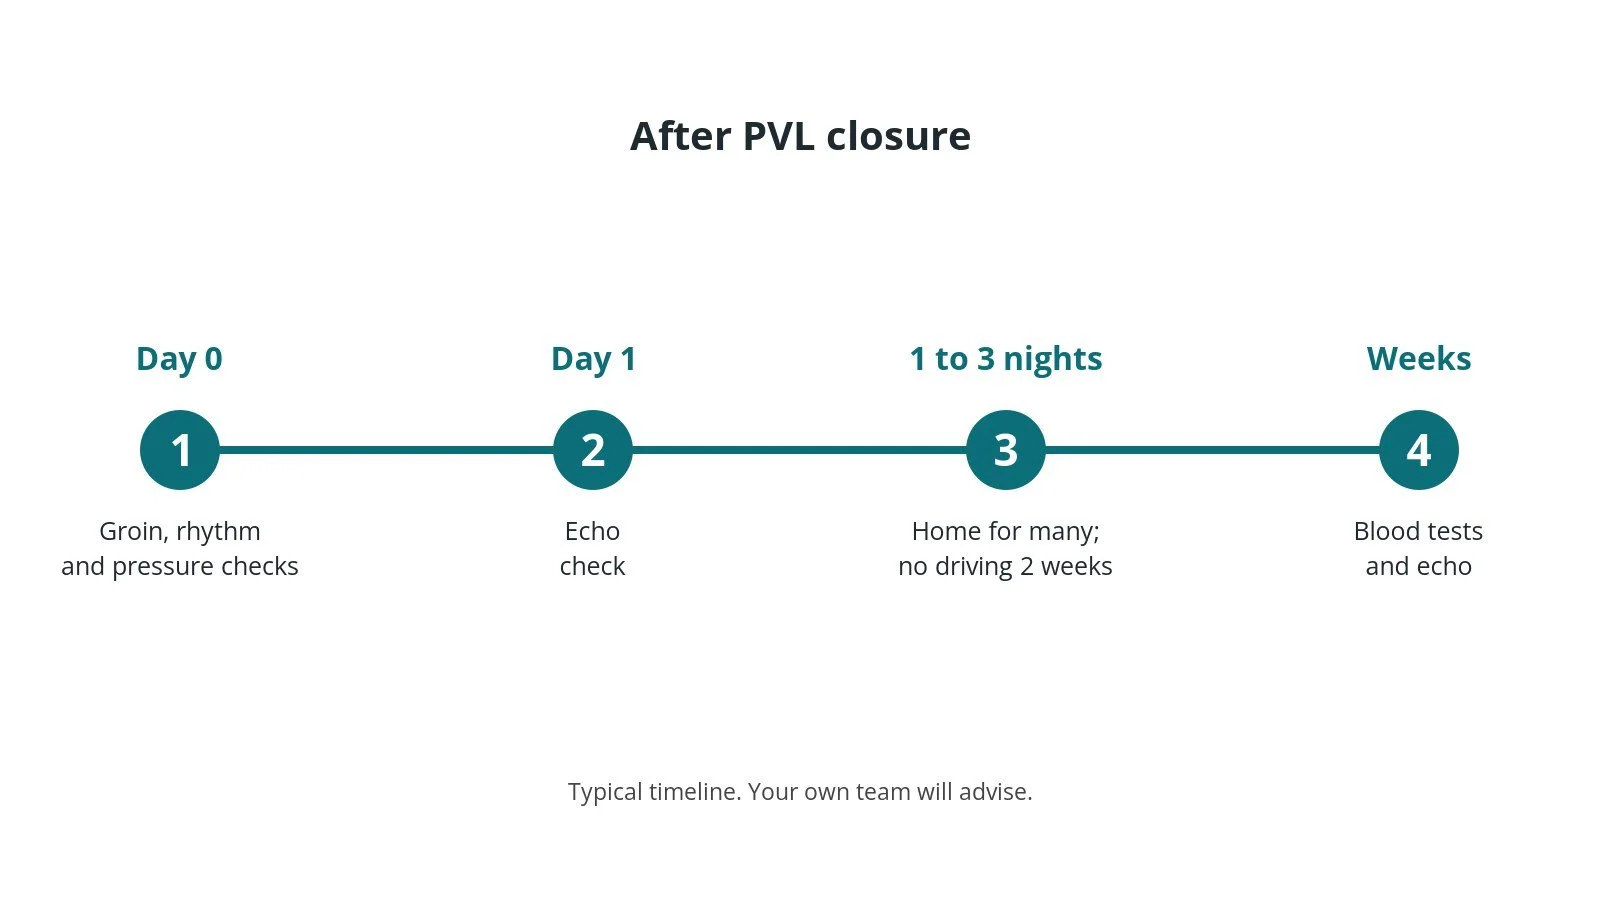
After PVL closure: (1) checks; (2) echo; (3) home after 1 to 3 nights; (4) blood tests and echo follow-up.
Risks and complications
Your team will discuss your own risks. Possible problems include:
the plug catching the valve leaflets, which may mean removing it
the plug moving (embolisation)
the leak not closing fully, or haemolysis continuing or worsening
bleeding or vessel injury
fluid around the heart (tamponade)
stroke
a remaining hole in the atrial septum (mitral approach)
Cath lab kit list (printable)
Barts example kit list
An example from one UK centre, written generically. Every lab has its own protocol, and sizes and doses vary.
femoral venous and arterial sheaths, sizes per device and operator
multipurpose diagnostic catheter
long braided delivery sheath, length and size per device and operator
standard and long hydrophilic straight wires; stiff support wire, per operator
snare for creating a rail, per operator
for mitral PVL: transseptal needle and transseptal sheath; steerable sheath, curve per operator
occluder plugs of several sizes and shapes, per device and operator
3-way tap, Luer-lock syringes, pressure lines, haemostasis valve
saline bag and spike; heparin as per centre protocol
3D TOE
Procedural steps (Barts example)
General anaesthetic and 3D TOE; femoral access
Mitral: transseptal puncture; steerable sheath aimed at the leak. Aortic: catheter in the aortic root aimed at the leak
Wire across the gap; rail if needed
Delivery sheath through the gap; occluder deployed
TOE check of leak and leaflet movement; release
Repeat with another plug if needed; sheaths out; haemostasis
First time in the cath lab?
💡 First-time tip
Have plugs ready. Several sizes and shapes may be needed, sometimes two at once. Know where they are. 3D TOE drives the case. Watch the echo screen; it shows where the leak is. Rails take time. Snaring and externalising a wire needs a second sterile sheath and calm teamwork. Release only when checked. A plug is not released until the echo shows the leaflets move freely. Watch the pressure. A sudden drop can mean tamponade or a stuck leaflet.
FAQ
Will the leak close completely?
Often the leak is much reduced, but a small residual leak can remain.
Is this instead of surgery?
For many people it avoids repeat open-heart surgery, but surgery remains an option for some.
Will my anaemia get better?
If haemolysis was caused by the leak, closing it often helps. Blood tests will check this.
Will I need another procedure?
Some people need a second procedure if a significant leak remains.
Related Cath Lab 101 guides
Sources
All checked on 10 October 2026. Each page's own date is shown where it gives one.
NICE. Percutaneous insertion of a closure device to repair a paravalvular leak around a replaced mitral or aortic valve (HTG585). nice.org.uk/guidance/htg585 (published 23 Jun 2021)
NICE. Heart valve disease presenting in adults: investigation and management (NG208). nice.org.uk/guidance/ng208
Vahanian A, et al. 2021 ESC/EACTS Guidelines for the management of valvular heart disease. Eur Heart J 2022;43(7):561–632. PubMed 34453165
NHS. Heart valve disease. nhs.uk/conditions/heart-valve-disease
DVLA / GOV.UK. Cardiovascular disorders: assessing fitness to drive. gov.uk
Disclaimer
Education only. This page is for general education for healthcare students, cath lab staff and curious readers. It isn't medical advice and doesn't replace advice from your own doctor, heart team or local unit protocols. Equipment and medicines are described generically. No product or manufacturer is recommended. If you think someone is having a heart emergency, call 999.
Disclosure: I work for a company that makes a device used in this procedure. This page is independent education, isn't sponsored or reviewed by any company, and doesn't recommend any product.
All diagrams on this page are original illustrations created for rodnieoro.com.